Friday, December 6, 2013

Talking Turkey about Cutters

 One of my followers has asked if I would compare cutters and frames, so today I'll talk about cutters.  Like many of you, when I first started hooking I used a rotary cutter.  Since I wasn't sure if rug hooking would be something I'd continue to want to do didn't desire to spend a lot of money investing in tools at first.

When I did decide to purchase a cutter the Townsend wasn't even born yet.  The options were Bliss, Fraser, Rigby and I had heard the word Bolivar, a Canadian cutter, but also heard it was expensive and with an extensive waiting list.  The waiting list was enough to thwart any ideas for that cutter if the cost wasn't. 

As I pondered my decision the Bolivar was eliminated but couldn't decide which of the other three I wanted.  My thoughts were that having one with suction cups would be great and could put it on a table top ~ plus it was a wee bit cheaper than the Fraser.  So the Bliss was my choice and I purchased it used from a hooking teacher reducing her stash. 

But then a friend had a Fraser 500-1 and I could see how fast the strips came out of that cutter compared to mine.  Once I had a little more disposable income I purchased a Fraser 500 and did like it better.  Besides, now I had two cutters and could have different size strips on each.

Oh, but then the Townsend was born.  And a happy birth it was and cheers were heard around the hooking world (yeah, I know I'm getting rather dramatic here aren't I?)  While there was a long hesitation on putting out that money at first, I decided to purchase the Townsend cutter and 3 cartridges.  I got the #6 for free (my choice) and purchased #7, #8, #8.5.  Later I decided to purchse the #9 and just recently treated myself to the #10 (1/2").  I just LOVE my Townsend!!!

Prices of cutters and blades are different now than then so I'll give you today's known cost:

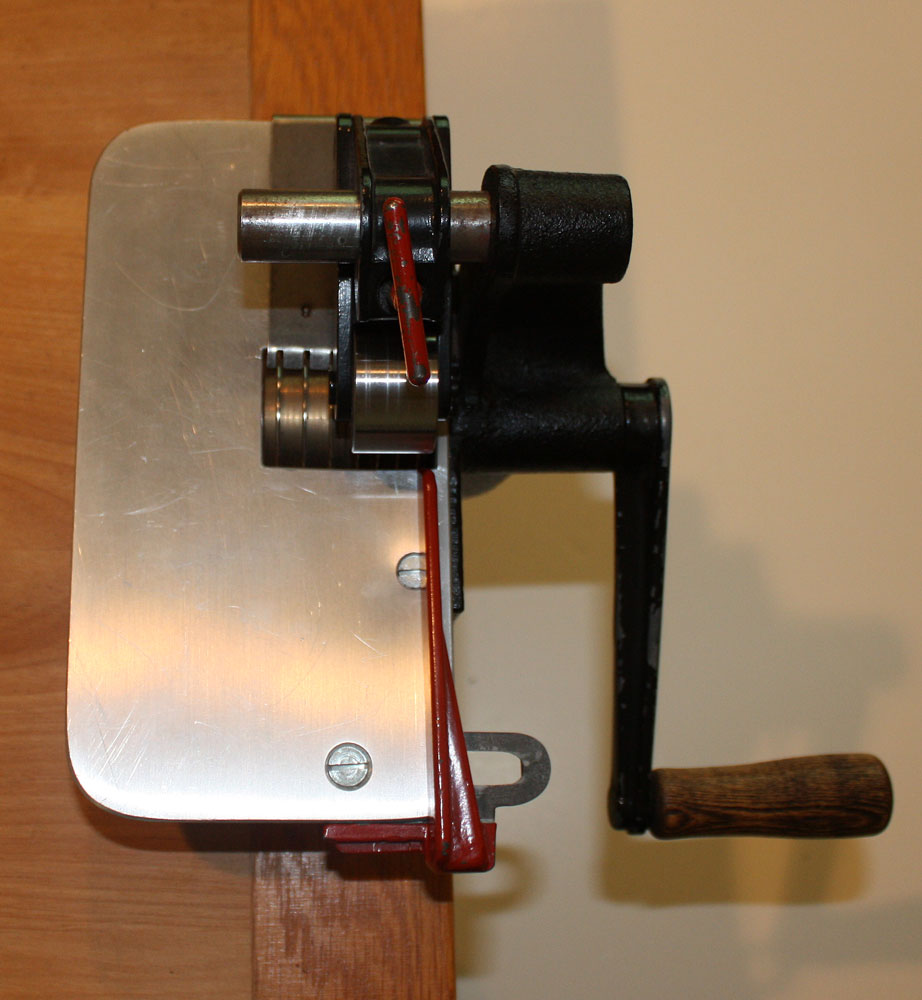
Bliss ~ Manufactured by Harry M. Fraser Company, has suction cups to mount on table.  It takes more cranks to cut the same length of wool than the Fraser 500-1 but does not require attaching to a table or other object.  Cost is $300 new from Harry Fraser and sometimes you can get them used either from Fraser, e-bay or other hookers who are upgrading to a Townsend.  Blades cost $37.50 and are interchangeable with the Fraser 500-1.
Bliss Model A
Fraser 500-1 ~ Olso manufactured by Harry Fraser Company requires attaching to a table side.  OR you could do what I did and buy a cheapo unpainted stool from AC Moore or Michael's and then it can be placed on top of a table instead of teetering on the edge.  It takes fewer cranks of the handle to go thru that strip of wool than the Bliss.  Cost new from Fraser is $340 and the blades are $37.50.  Again these can be purchased used on eBay or hookers who are upgrading.

Downside to these cutters is that changing blades requires to loosen and remove the blade and loosen the tension of a knob either on top or under the particular cutter.  Then replacing the blade with the desired size and tightening the bolt and tightening the tension again until it cuts properly.

I would like to add that Fraser gives EXCELLENT service and I still own one of each and it is on those cutters that I have my small blades attached.  Since I rarely use anything small just didn't want to spend the money for a Townsend cartridge for anything under #6 so kept my dependable Bliss and Fraser, just for small cuts IF I needed them for eyes or flower centers.
Fraser Model 500-1
The Rigby requires "fingers" to go with the cutter.  I don't know what the new price is for this cutter.  I owned one briefly and sold it as soon as possible.  Frankly I didn't have much luck getting service from the manufacturer but perhaps that issue was something of the past.  While I've heard people who like this cutter, it is not one I would tell my best friend to buy.
The Bolivar Cutter has 3 types of cutters.  The Standard has 3 fixed blades (you get to choose the sizes) and the entire unit rotates around in a circle until your cut size appears.   There is a Model 5 which you can interchange blades, and also offer a single blade option.  You can check out their web site at the link just above.  The cost of the Standard is $600 plus shipping from Canada.  If you check out their web site you can see the complex pricing schedule depending on which model suits you best and for what price.
Bolivar Fabric Cutter in action
Then there is the lovely Townsend frame which is now being manufactured by Beeline-Townsend.  The cost of the cutter body new is $540 and comes with one cartridge (your choice of size), a cutter caddy, hex wrench and brush .  Additional cutter cartridges are $156 each.
I cannot think of any down side to owning a Townsend cutter.  If you have ever changed blades in a Bliss, Fraser or Rigby, the first time you change a blade on a Townsend you will be sold.  All you do is slide over the black top section, pull out the whole cartridge, insert the new cartridge and close the black top lever.... VOILA!!!!!!

No, I don't work or get any commission for this, I am just one happy hooker using the Townsend cutter.   I hope that I've been able to answer some questions for you.

Have a great evening.

Saundra

Thursday, December 5, 2013

Long Island Farm Binding

This will be my final posting on the binding of Long Island Farm (design by Lucille Festa) even tho I'm only 1/4 of the way finished....but at least one side is done.  This is what it looks like since the final loops were pulled.  If you recall I'd considered having the fence on the left look as tho it was going down the back of the hill.  Well I tried it and didn't like it so pulled out the loops and made it more symmetrical.
Someone did comment about the mitered corners being done neatly.  One secret is having the pointed corner sheared off as shown here. 
Next you fold down the corner like this.
Then fold the two sides inward until they meet in the center.  After which you pin and stitch.  You would basically do the same thing with the binding tape.
This is what the edge looks like with the variegated colored yarn which covers the very edge of the backing and the colors work well with the colors used in the rug.
I'm doing an update because I had a request to see the back of the rug with the binding.  Since Long Island Farm isn't completely bound I will show a portion of the one side which is at least whipped with the yarn but still isn't stitched down on the inside portion of the binding tape.  Here is that picture.
But here is a picture of the back of a rug "Henny Penny" by Woolley Fox, which is completely bound.  By the way, that design is on sale half off (check specials) until they are sold.  By the way, this little mat was rolled up so that is why you see wrinkles in the binding tape.  Since I have it for sale it doesn't get used and keep them rolled up.  But perhaps they need to come out of hiding and displayed on my chests or harvest table once in a while to get aired out.  I just LOVE Henny Penny!
Glenda has asked if I would write more about different cutters and frames since she doesn't live near other hookers or know of any shop where she might otherwise be informed.  I'll probably do one post on cutters and the next day talk about frames.  Thanks to all who have questions because this is how I know what you have an interest in.
 
Have a great evening everyone; and please be kind to one another.  This is the season which finds people's patience level being tested.  If standing in a long line, take a deep breath and maybe even crack a joke which might get a chuckle from someone and even neutralize situation.
 
Saundra

Wednesday, December 4, 2013

Seems Christmas Came Early at My House

Good heavens but there were a lot of presents delivered for me today and it feels like Christmas here at my house.  One fun package was the giveaway I won from the blog Primitives by the Light of the Moon (thank you Ginger).  Look at all the goodies that came in this one giveaway; there is the beautifully needle punched bird which has a hanger for a tree or to place on a hanging angel doll, a kit that includes wool cut outs and antique quilt piece plus calico back fabric, also swatches of fulled wool that could be used for wool applique.  WHOO HOO!
And this is another kit that Ginger offers and one that I recently made.  As you can see I've put it to good use already but pulled out some pins so you could see the design better.  The wool flower cut outs were so perfectly cut that it appears they are metal form pressed out but that is very unlikely since it would be so costly.  I'd say Ginger has two precise pair of hands which does all this perfected cutting.
Next package was a birthday gift to myself which arrived the day before my B'day.  Yup, a new cartridge for my Townsend cutter.... a #10.  I purchased the cartridge from Searsport and it was shipped to me directly from Beeline and bypassing a trip to Searsport (thanks Beeline and Searsport).  I didn't think I'd ever get a cartridge that big but since I'm loving the torn strips figured that having the #10 would take a lot less effort.  However, the piece that was started with Betsy with the torn strips WILL continue to be the torn strips.  That awaits in the wings while I continue slowly to pull loops on Shadow girl.
And speaking of Betsy....... my wool order also arrived today.  It hasn't been washed yet but that will happen in the next couple days for sure.  There's no rush since I've got two rugs on the burner at the same time now anyway.
The bottom wool is the wool I fell in love with at camp and knew more was needed for my stash.  It is called Donkey Cabbage.  And, I just read that the sale is extended until TODAY.  So don't walk, but RUN to the web site and place your order.  Here is the link to Heavens to Betsy's blog which will give you the coupon code.

Sorry there's no newbie news tonight as I've not accomplished a thing more on the binding.  Uh, remember..... binding is not my favorite thing so it sits in the wings.

Have a great evening everyone and warm fuzzy bear hugs to everyone.

Saundra

Tuesday, December 3, 2013

Binding Long Island Farm #2

I've been rather busy cutting grass (uh, mowing the leaves) and yes raking some too but suffice it to say most of my time today has been spent doing less desirable tasks than hooking or finishing rugs. 

BUT, not to let you newbies down, here is the next installment of binding my Long Island Farm rug using the cotton rug binding method. 
 If you read the previous post you saw that I did some sewing around the perimeter of the design 1" or so beyond the last hooked row.  After which I trimmed the excess off.

Then I mitre the corners of the foundation (backing) so it will lay flat.  Yes, just a primitive stitch, but it works well enough and the stitches will be hidden with the binding tape.
Then I use a wool yarn to whip stitch the edge closest to the last hooked row.  I start with a little rug tape extended a little beyond the corner.  Since it looks better with mitred corners that is where I like to start.  Some people like to start on the side of the rug.  But each rug hooker has his or her desired style.  This picture looks like the variegated wool yarn is pink but it appears red in real light. 
This not the only way to bind a rug and it is also not the only way I HAVE BOUND a rug. 

Have a great evening and if any newbies have questions they'd like me to talk about, please feel free to write me at saundra125@comcast.net

Monday, December 2, 2013

Beginning Binding Long Island Farm Rug #1

During the course of my blog postings I've shown various ways to bind a rug and this would be a repeat for those of you who have followed me for a while.  However, for you newbies just beginning to read my blog this will show how to do one type of binding using a combination of cotton twill binding tape and yarn.

After steam pressing the rug front and back and letting it rest over night, I then measure out 1 1/8" away from the last row of hooking all the way around.  I also mark the point of the corner off to reduce bulk at each of the corners.


Next I do two rows of straight stitching all the way around; the first row is ON the drawn line and the second row would be just inside the previous sewn line but in about 1/4".
Then I do a zig zag stitch to secure those threads between the two rows of straight stitching.
This is what it looks like after all the stitching.  Next I trip off the excess close but not encroaching on the stitched area.  Notice the flat corners which will reduce bulk on the corner when binding.
Some may think it is Overkill?  I don't think so.  Since many an hour was spent hooking this rug using good wool and good linen foundation, the last thing I want to happen is the teasing out of the rug along the perimeter.  And want you to know I have seen it happen when people just trim their linen thinking that since it is covered with a binding or whipped with wool that the ends are safe. 

Don't believe a word of it.  I have a beautifully hooked rug given to me by a dear friend who is no longer here.  Just by my picking it up by the sides noticed that one side was coming apart.  So now I don't feel as tho I can even hang her rug unless it is securely attached some how so the weight of the rug wouldn't stretch the linen foundation and tease out the top portion of the rug.

Frankly I do not like the binding part.  But I love my rugs and know that finishing a project (binding in this case) is something to take seriously and do it properly.  I do the same thing for my small mats and purses I make. 

Have a marvelous Monday everyone.

Saundra
 

Sunday, December 1, 2013

DECEMBER'S Stitchery and Quilt Applique'

Yup, the first of December is here and so it is time for this month's project that I made back in 1998.  All the other blocks were done in 1997 but this one was completed after moving into the house.  So it is this December quilt applique that I chose to do for the home just in time for the holidays.  This wasn't a pattern of the 12 month series.
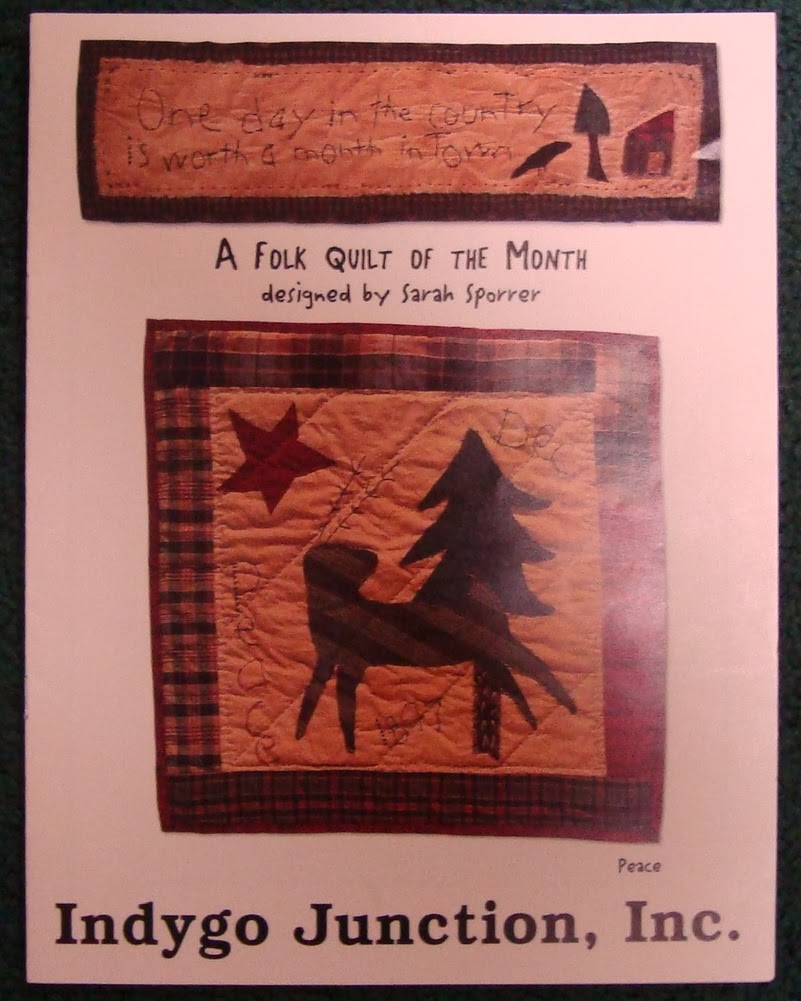
The booklet below is the pattern that, had I followed all 12 designs, would have normally been the quilt block to be shown.  Since I'm no longer interested in quilt applique, perhaps this is a design that I'll hook instead.   Uh, for next year.
And here is the Stitchery for the month of December.
Sorry that I don't have any revelations for you newbies, but I've been busy doing other things so haven't gotten any further on the rug binding for Long Island Farm beyond trimming the linen.  Matter of fact I've not even hooking as much as I'd like. 

Hours yesterday and today I've spent on the computer listing my Gail Wilson doll kits and patterns on e-bay.  Since I don't have an interest in making dolls it seemed appropriate to offer them for sale on e-bay. 

Hope you have a great Sunday.

Saundra

Friday, November 29, 2013

RUG HOOKING BARGAINS

Some of my favorite stores are offering discounts or free shipping but for a limited time during this Black Friday and Small Business Saturday. 

Heavens to Betsy is offering an additional 15% off wool above their tiered pricing special.  So hurry before all the wool is gone.  I placed my order early to ensure I got what I wanted.  One color was Donkey Cabbage which is hooked in that square center section, the top part surrounding the light colored odd shape.   I purchased some at her rug camp and since I liked it decided to buy yardage of it.  There is a little red spark in it which I think plays nicely off the red and tones down the brightness of the other red. 
Spruce Ridge Studios is offering a Small Business Saturday discount on patterns, so check that out as she has some great designs.  My friend adores all Lori Brechlin's patterns and plans to buy more during this sale.

Also Searsport is offering free shipping to people in the USA who place their order before Monday.  It also included frames, etc.  So take advantage since shipping isn't cheap.  I took this opportunity to order the Townsend-Beeline #10 blade (1/2"). 

Woolley Fox is offering a 50% sale off a select number of patterns.  That is quite a nice sale also.

For you newbies, this is a way for you to save a little if there is something you want.  And as far as tips, I'm in the process of binding the Long Island Farm rug and am taking pictures of the process so that will a future post for you to check out.

Hope you all had a wonderful Thanksgiving.  I know that I came home from my son's house with a full belly.  And, came home with the dark meat and bones (they only like the white meat) so plan to make some soup.  So Thanksgiving turkey is a gift that just keeps on giving.  Warm wool wishes.

Saundra

Wednesday, November 27, 2013

Cleaning Hooked Rugs and More

The other day I was asked about cleaning a hooked rug and would it ruin the rug.  This Eat Crow rug has been on my kitchen floor in front of my kitchen sink since 2003.  As it is probably the most stepped on rug and in the most vulnerable spot of all my rugs, I'd say it has held up well.  Yes, I have dribbled or dropped liquids on it but all has been cleaned up without a problem. 
Just a few days ago there were a couple spots which I took care of.  They were small so all I did was take a clean cloth, wet an area larger than my finger, put a little detergent (no bleach) on the cloth and rubbed well.  Then took another clean area of the cloth, wet it and rubbed as I was trying to clean out the soap in the area.

When I was a red meat eater I did dribble probably half a cup or so of 'red juice' if you know what I mean, on the rug.  Immediately I took it to the laundry room and ran clean water on the area, then put it on the floor with towels and stepped on it to try and remove the moisture.  I ran more water on it and repeated.  I was trying to dilute the stain.  Then my final step was to use a mild detergent and water and scrubbed lightly with a brush.  Rinsed and repeated the towel step on technique. There was never a permanent stain thank goodness. 

Afterward cleaning a rug, in the summer you could put the rug on the back deck face down to dry or in winter in the laundry room face down on towels.  I happen to have a dryer which has a rack that prevents the cylinder to spin. So I could have used that too.

I have a friend (who will remain nameless but she knows who she is), even put a whole rug in the washer.  She said she had nothing to lose because her pet had an accident on it.  So it was either put a hose on it to remove the worst of the incident and wash it or toss it in the trash.  So she figured she'd put it in the washer and give it a go.  Cannot remember what type of backing but know it was NOT burlap.

Yesterday's post I commented about starting with a tail up in the circle and ending with the tail up in the same hole.  Someone asked if you always start and end with the tails up.  The answer is YES.  Then you would snip off the end of that remaining piece of wool even with the other loops. 

Feel free to write me with additional questions any time.  I have a feeling everyone is going to be quite busy from now until Friday so I'm wishing everyone a very happy Thanksgiving.

Saundra

Tuesday, November 26, 2013

CIRCLES and STARS


Thanks to a couple of my newbie rug hooking followers I've had a couple questions asked.  This is great to be able to actually help with subjects presently in the mind of someone.

Question:  "How do you hook a circle... do you start on the outer edges or in the middle".

Answer:  You start the circle just inside the line drawing (not on the line) so that the circle or motif won't swell to a larger size.  Here are two rugs to demonstrate; first is Lollipop Bouquet, a design attributed to Magdalena Briner (with a flash).  The circles (all 66 of them) measure between 1 1/4" to 1 1/2" in diameter.  They were all hooked using #8 wool strips (1/4" wide strip).
And a close up of some circles shows some closer hooked strips if the wool was thin and more rounded if the wool was a nice lofty strip. 

Since I used wool from my worm basket used what was there so there was a fair amount of thinner wool which I wouldn't normally use to hook with but had it so used it.  After all, that is what Magdalena would have done.

Another rug with circles is Crow Sampler, a design by
Ali Strebel.  I did, however, take some creative license as I put the circles all around the perimeter of the rug and not just the top half of the rug.  Here is the rug in full view.
Here is a close up of some hooked circles.  Again, the circles were 1 1/4" in diameter and were hooked using #8 (1/4") wool strips.  I hooked just inside the line, came around and ended my strip in the same hole where I started with the tail up.  Then I'd start my next color starting in a different location than where the other color was started.  Usually I go for the opposite side to start the other color.  Then the center was a tail up, loop and tail up.
 
And often people will ask if you start a star on the tip or where.  If you want a really sharp pointed star you can start and end at the point.  However, you don't know where the length of wool strip will take you and it might not end at the next point.  I don't get anal about it and normally start on the inside dent and hook until the color runs out and then start another strip.  Again you would want to start hooking JUST inside the star's lines so it doesn't grow.
Question:  Which cut is to be used for which design or is it personal Preference and what do the numbers mean?

Answer:  Cut size is a matter of personal preference..... HOWEVER, some designs do dictate how narrow the cut should be.  I like primitive designs but if it is an eye of a dog (take for instance Shadow) I hooked the eye in a smaller cut than the #8 I used for her hair, nose, etc. 
The numbers refer to the (width) of a wool strip.  Cutter manufacturers assign numbers to them and that is why I refer to the #8 (my first desired strip size) and my new favorite is the #8.5.  Here is a breakdown in incremental measurements that will help you understand the WIDTH of a strip:
·          #2 cut = (2/32-inch) = 1/16-inch
·          #3 cut = (3/32-inch)
·          #4 cut = (4/32-inch) = 1/8-inch
·          #5 cut = (5/32-inch)
·          #6 cut = (6/32-inch)
·          #7 cut = (7/32-inch)
·          #8 cut = (8/32-inch) = 1/4-inch
·          #8.5 cut = (10/32-inch)
·          #9 cut = (12/32-inch) = 3/8-inch
·         #10 cut = (16/32-inch) = 1/2-inch

And there is another part of Annie's question which I will answer on another post as this is getting rather lengthy. 

If anyone has questions they'd like answered, please feel free to write me at saundra125@comcast.net.  Have a great evening everyone.

Saundra


Monday, November 25, 2013

ALMOST TURKEY TIME (and Newbie Time)

Yup, people out buying turkeys or getting ready to refrigerator thaw them out to prepare for cooking the Thanksgiving dinner on Thursday.  This is a design I hooked and was enlarged from a Needl'love booklet .  It has been a favorite of mine and you can see the single "S" on it so this one was also a rug hooked betwixt and between the divorce and name change.   However, I do have fond memories of being with the rug hooking friends who comforted me during that time of hookit it at camp.   I can remember being in the corner of the class room at Cape May with Lucille Festa as my teacher.  In the class and beside me was my gal pals Deb, Char and Yahna.
Thanks for all the positive comments from people who have read and are now anticipating the "Newbie Rug Hooker Tidbits" section of my blog. 

Topics tonight are:

Do I hook in every hole?"

No, not usually unless you are using a very fine cut.  However, if you are hooking a #3 wool strip doubt you are reading my blog.

~ How many holes from the last loop do I pull the next one?

It depends on the type of backing/foundation and the size cut you are using.  So I use Dorr natural primitive linen and hook in either #8 or #8.5 normally, so I would hook PROBABLY in a space sequence of 3, 3, 2, 3, 3, 2.  Now in turning a corner or rounding a bend it might be just the next hole over from the X of the linen weave turn. 

The object is to not pack tight nor too loosely.  You want your loop to be like a tear drop where (sideways) you can see an open space at the top between the loop.  AND, when you hook the next row it would be normally 3 spaces over.  Again, it depends on the cut you are using.

You want your rows to look like little soldiers with their shoulders JUST touching but not crammed together.  You also want to see the roundness of the shoulders from the top so the light can catch the true color of the wool.

~ What prevents the loops from pulling out?

Just the pressure of the loops keeps them from coming out.  NOW, my girl Shadow would sometimes sit on the rug and turn to scratch or lick herself and perhaps a loop would come out.  Since I hooked it all I have to do is just replace the loop with my hook.

~ How do I keep my rug from slipping and should I coat the back?

Absolutely DO NOT coat the back with that rubbery stuff.  If you have ever had a purchased mat which was coated with it you know how it disintegrates.  That mixture does not allow your expensive and wonderful wool to breathe or free itself from dirt and moisture. 

If you want to keep your rugs from slipping you can purchase those rubber woven mats which are very similar to the kitchen shelf linings.  Those are sold in the rug or mat department and sold in different sizes;  they work great.

Okay you wonderful world of newbie rug hooker wannabes..... I need some questions you want answers to.  Please write me at saundra125@comcast.net so that I can keep the help flowing. 

Have a great evening, stay warm and have a thankful wonderful Thanksgiving day.

Saundra

Sunday, November 24, 2013

TWO ROOSTERS and NEWBIE RUG HOOKER TIDBITS

Every once in a while it is fun to look back through pictures of rugs I've hooked, particularly those that I've sold and can't see here daily.  This is one I sold at a show the day after my husband moved out of the house.  Figured I'd better take the opportunity to make money at the show by selling anything someone wanted to buy.  You can see the initials 'SS' on the rug and after the divorce took back my last name from my deceased husband and father of my son.  Therefore you will see the initials of SP on my rugs after 2007.  This is shared in the event you're confused by the different initials on rugs I show. 
Anyway.....this is one rug that I'd really like to hook over again.  The roosters I'd try and replicate but would do something less in your face with the background next time.  I think there is just too drastic a change in color of the background so would do that a little differently.  Must say tho, I did really like that rug at the time.

Newbie Hooker Tidbits

Now it is time to talk about backings (foundation cloth).  As probably all newbies know, our foremothers used mostly burlap to hook on as it was most readily available from sacks of grain, chicken feed, etc.  They would open up the seam allowance, spread the burlap sack open and if there happened to be a colorful chicken or rooster depicted on it they might even hook that into the design.  Or they would take charcoal or other writing implement and draw a naive design on the inside part of the burlap.

Today burlap is not a good choice to hook a rug for the floor as it becomes too brittle and unstable.  There are numerous options for hookers now:

Natural linen
Bleached linen
Hairless linen
Belgian Linen (a lighter and more open weave of linen)
Monks cloth
Rug Warp
Verel
Thinly woven wool not good for hooking as cut strips
Burlap

My choice is Dorr Natural Linen but have also had the experience of hooking on all the options above with the exception of verel.  I want to add also, that the monks cloth you purchase at JoAnn is NOT the same type for hooking.  JoAnn sells the stuff most dedicated to another type of handiwork but NOT hooking as the weave is too large.

Now I must admit that when I first started out I hooked on burlap for small pieces which would NOT go on the floor.  Since foundation cloth is relatively expensive there is absolutely nothing wrong with picking up a yard of burlap at JoAnns or Hancock Fabrics to start on.  You could practice on making a small mat, hot plate, chair pad, etc. on the burlap and it would be just fine if not on the floor.

Once you determine the size of your project, be sure to allow at least 3" all around to give yourself room for the margin to tuck into your hoop or around your frame.  Pull a thread to ensure you are cutting on the straight of grain. 

To prevent the edges from raveling and don't have a sewing machine or serger you can use Duck Tape and fold over the four sides to keep it from raveling. 

Let your inner child come out and draw something small and easy since you probably have limited colors of wool.  Make a mug mat, hot plate or chair pad ~ something small and quick for your first project.  It could be a star; draw out a snowman, or soon Valentines day will be here so draw a heart.  Oh, BTW, you can also hook with yarn, cotton or flannel fabric, tee shirts, anything.  That is what our foremothers did anyway..... they made do.

Tomorrow I'll try and cover:

~ How many holes from the last loop do I pull another?
~ What prevents the loops from coming out?
~ Should I coat the back of the rug with the rubber stuff to keep from slipping?  NO!!!!!!!!!!!!  I'll answer that one right now and cover it again tomorrow.

Enjoy your Sunday evening and hope you are warm.  It is frigid here in Delaware where the wind chill factor is in the teens.  But thankfully we aren't having snow and feel for you guys who are being hit with that early storm.

Saundra


Saturday, November 23, 2013

Another Domestic Zoo Picture

I love it when people send me pictures of their finished Domestic Zoo. Although I've sold dozens of the patterns only a small handful of people have shared their photos with me.  

My friend Shari started this Domestic Zoo rug a few years ago and has hooked several other rugs and kept busy making dolls before finally getting this one bound recently.  Today she sent me a picture.  Thanks Shari, so happy it is finally finished and one UFO out of the way.

   
DANG IT.  this is the way the picture came and then I turned it on it's side with the PAINT program in the hopes it would be sideways and upright.  Nope.... so sorry.

Here are a few other versions of Domestic Zoo:

This one is by Susan and nice with a dark background.
A Domestic Zoo hooked by Mary.
And a Domestic Zoo by Debbe.

Thank you all for sharing the rugs with me.  I'd really like to have pictures of the rugs hooked by others if you're willing to share. 

Now to Newbie Hooker Tidbits.

Annie wrote and we chatted about her not having a cutter or linen but did have a rotary cutter.  Hey, in the beginning I didn't have a cutter either and used a rotary or scissors. 

First you must rip the wool so you will start out on the straight of grain. You could rip every 3 or 4 inches and either take the rotary cutter and use a quilt guide edge to cut the strips to your width.... OR, you could even rip the wool every 1" or so and scissor cut down the middle (or rotary cut down the middle), down the middle again, until you achieve your strip size of choice. 

When first starting out hooking my strip size of choice was 1/4" wide a/k/a #8 cut in cutter strip language.  But since then my favorite strip size (because I'm a primitive hooker) is #8.5.  And, if you've followed me for a while know that I've begun hooking with a torn strip ranging from 1/2" to over 3/4" depending on how straight my 'snip' is.

Tomorrow I'll talk about backing (foundation).  There's burlap, monks cloth, linen, hairless linen, verel and loosely woven wool.

If any newbies have subjects they would like me to talk about you can write me personally by writing me at: saundra125@comcast.net.  If my info so far has not been clear enough, please also write me for more explanation.  Since this is a craft/art/hobby that I enjoy so much it would be a pleasure to share the joy of TRADITIONAL RUG HOOKING.

Have a great evening and see you same time tomorrow night.  Stay warm and wrap up in your woolies.

Saundra

Friday, November 22, 2013

I Want to hook a Santa!

Lately I've seen all these cute Santa pieces being hooked and needle punched and each year promise myself that I'll hook one and have it ready before Christmas.  Uh, don't see that happening this year either since it is almost Thanksgiving and I've got 3 rugs going already.

There are many cute designs with a Santa and the one which keeps beckoning me is the antique Santa.  My friend hooked it and since the original antique is faded, she initially forgot to hook the mitten going around the back of the deer.  Not to worry, she pulled out wool and hooked in the mitten.  This is a picture before but you now see which design is calling my name.  Probably mostly because it is an antique rug.
And now to Newbie Hooker Tidbits

As I was self taught how to hook can remember the most frustrating thing for me was pulling those first loops.  I knew to start with the tail up, and that you pull the loops up as high as the strip is wide.  That I learned in reading the information in Rug Hooking magazine. 

Okay, .....maybe I did have to tug on the tail a little when the first loop was pulled.  Next was the second loop to be pulled and the first loop dropped down.  So there becomes a battle of lifting the first loop up and pulling up the second loop again.  Over and Over. 

That is UNTIL I realized what I had to do was roll (lean) my hook backwards and upward against the first loop.  That is what prevented the first loop from dropping down because it applies pressure to that first loop.  And yes, the second loop is now a little higher than that first loop but your weak hand (under the frame) can adjust that loop. 

It will go a little slow at first but soon you will get a rhythm and move along faster.  Sure hope I was able to describe it okay since there is no one here to take pictures of the process.

And, if any of you newbies have a particular question or topic you'd like for me to address, please write me. 

Have a great evening.

Saundra

Thursday, November 21, 2013

Rug on the Wall and New Segment

Most of my rugs are on the floor and a few on the wall.  For a while I enjoyed the Wee Folk rug in front of my garden tub but today decided to hang it over my bed.

The bedspread (summer quilt) I made in 1998 after moving into this house.  In full disclosure I don't consider myself a quilter because I did it the easy/lazy way with big blocks and the sewing machine.  Unfortunately the spread shows lots of distress due to age but also because we let our departed Shumba and Panzer sleep on the bed.  If you look closely you can see two black dogs, a cabin with flying flag in the center.  I did a primitive running stitch with the words "HOME, Palace of the Soul".  But those words are thread bare now but my memories linger.  Those angels hanging on the wall were made by my friend Frannie.

Another view you can see the primitive rug I hooked of Shumba and Panzer on the floor.  Their Memorial narrow cut rug is hanging on the wall behind me as I was taking this picture.

Now we get to the 'New Segment' part.  I receive very nice e-mails from everyone, but particularly the newbie hooker's comments make me feel good to think they are getting something from my blog.  Upon getting these e-mails I normally respond to them that I'd be happy to answer any questions they have to help them along their journey.  Sometimes someone might write.  But more times than not they are probably too intimidated or maybe even think a question is stupid when it isn't. 

So this segment will be called "Newbie Hooker Tidbits".  I'll try to post something on each blog remembering the things early in my hooking experience.   Tonight I'll cover starting your wool stash.

Wool Stash ~  When first starting out there was absolutely no wool here, no colors to choose from so how can I start a rug.  Since I didn't know if I'd even like to continue with the hobby didn't want to spend a lot of money on wool and supplies. 

Since it is winter now the local thrift store is a wonderful place to buy and use recycled wool.  On occasion they will even have bag sale day where you can get more for your money.  Men's blazers are wonderful because they are textured wools (plaids, herringbone, etc.) but coats and blazers have their issues of work vs. waste with the stiffening.  Slacks and skirts are marvelous.  Frankly if it is a color I want the time spent ripping apart a blazer is no issue.

Look for the 100% wool label but DO NOT BUY worsted or the thinly woven wool which won't full up when washed (the term here is not FELTED but fulled).  

Don't bring those wools into the house until you are ready to toss them into the washing machine.  Yes, the washing machine.  You want to start your stash with clean and critter free wool.  I normally tear apart my clothing in the garage or on the back porch and don't bring them in the house until ready for washing. 

For skirts and slacks I usually rip out the hem at the bottom, rip out the lining (check pockets), and wash and rinse on warm.  Then I also dry on LOW with a fluffy towel or two depending on the amount of wool being washed.  Once dry I rip the seams open, cut off the waist band etc. and toss those.  Some people totally dismember the garment and then wash all the panels.  So that is a personal thing. 

Tomorrow I plan to write about my first hooking problem with the second or third loop pulled.  The first one was usually okay, but the second made the first loop drop down .... WHY wasn't I making progress???? Very frustrating. 

Check back tomorrow my fuzzie woolies.  And have a great evening.

Saundra