Showing posts with label Olde Patina dye recipe. Show all posts

Tuesday, November 5, 2024

OLDE PATINA DYEING

I have dyed with walnuts, onion skins but this is my favorite recipe to dirty up some bright, white or other colors for that antique look.  I did three pots with different amounts of dye in each pot and didn't stir much as I wanted a mottled look.  Some dye colors absorb faster than others that is why you will see the variance in colors in the wool results.

On the far left 1/2 yard was dyed in a pot using 2 tablespoons of dye, the before at the top, which is obvious.  Will provide the recipe further down in the post.  Seemed a little too dark but will be used in a future rug.

Next pot I only used 1 Tbls. for the 1/2 yard in the middle ~ the top wool is the before, the one just under that is the result from that pot.  The 3rd piece of wool just under was in the third pot along with that wool to the right.  Not sure of amount of wool as I didn't measure it but was less than 1/2 yard so I used a tad less than 1 Tbls. dye.
If you search "Olde Patina dye Recipe" in the box at the top left of  my blog you will see previous dye jobs using this recipe which is in the Beautiful Wool dye book by Laurice Heath.  Here is the recipe:

OLDE PATINA
1/2 t. Khaki Drab (Cushing)
1/8 t. Cushing Old Gold
1/8 + 1/16 Golden Brown Cushing
1/16 t. Dark Gray Cushing
1/64 t. Wood Rose Cushing

pour in 1 cup boiling water and stir.  From that cup I used tablespoons for the dyeing.  FYI, I have dye spoons which includes a 1/64 t. measure.

If you want to see another topic covered in a blog post like antique rugs, Cape May rug camp, etc.  just type the specific word in the box and you will see some old posts regarding the subject.

GOD BLESS AMERICA.
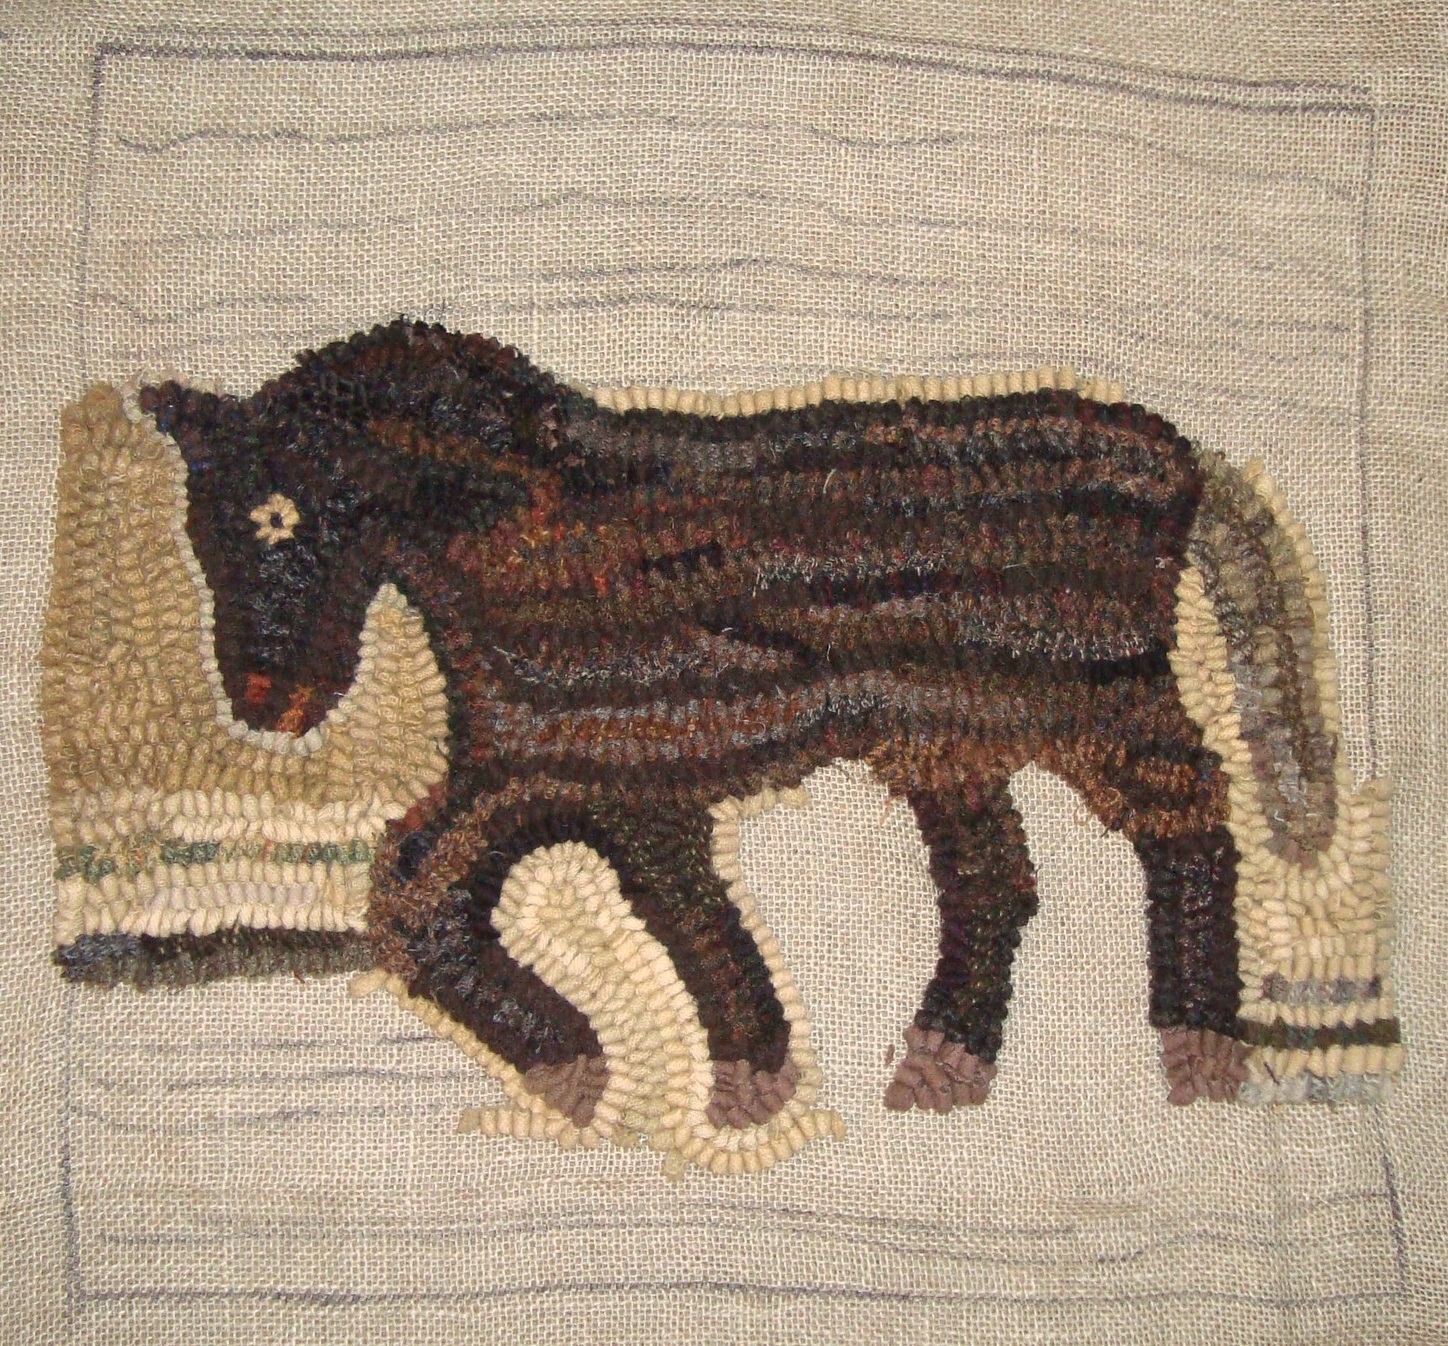
Designed and hooked by Polly Minick

Saundra

Sunday, June 12, 2022

Weekend Stuff

Pulled out the dye pots again to do a little Olde Patina dying which was successful.  This is about a yard give or take and done in two dye pots.  Each had some cream wool and off white wool.  One pot had 2 tablespoons of dye and the other with 1 1/2 teaspoons.  In antique rugs not all are soiled evenly so wanted various degrees of dirty white.  
Am planning ahead for when one of these vintage rugs becomes the next one on my frame.  And I have darker dirty/muddy available.  The first old rug is known as Wyeth Rose previously shown in my antique rug show.
Or perhaps the wool will be used when I want to hook these gorgeous deer.
Also cut and serged linen on which a design was drawn for the 'next pattern on my frame'.  Nope, it isn't on the frame yet because I'm determined to finish Mother and Fishbowl.

If you want to see the Olde Patina Recipe you can see it and a previous post when worms were overdyed with it HERE.

Happy hooking.

Saundra


Monday, April 15, 2019

Misc. Rug Hooking Chit Chat & Tornado

The last couple days hooking Early Farm Scene realized I was critically close to the end of Old Patina dyed wool.  Luckily there was more solution left so grabbed approximately one yard of cream, white and wheat wool to over-dye.  It is in the dryer now and only hope there will be something to use for the rest of the background.  Since weave and wool content varies it is always a surprise when dyeing.

This is what Early Farm Scene looks like now.  Looking closely you will see a color and slight value difference in background on the left between the tree and black sheep.  That was in the original antique so was able to use some of my olde patina wool from previous dye lots to get that look.
This is the original antique.
The linen I'm hooking on was purchased on ebay for a good price and is not drawn to scale.  Seemed like a great deal on linen (and it was) but now realize if I'm crazy about hooking an adaptation then I should draw it out myself.

Some things I want to change, which was not the fault of the purchased pattern, is pulling out the purple in the top motif (is that a sun or crop area?).  That purple needs to be red.  Also my Cross is unevenly hooked so that must be fixed.  The reset I can deal with.

Now to the tornado. Here in Delaware we get snow storms, hail, flooding, hurricanes, had a couple mild earthquakes and sometimes tornado warnings.  Of all those things it is tornadoes which scare me to death.  

When living in California was terrified of the earthquakes because they had more magnitude than encountered in Maryland and Delaware.  

During the wee hours this morning there was an EF2 tornado touched down between my town of Seaford and neighboring town of Laurel.  On the news it was reported to be about 50 yards wide and the wake of damage traveled 6.2 miles, you can see some pictures by clicking HERE

After enduring the two trees blown down with just straight winds last March 2, 2018 this would have been very scary if I'd had my iPad in the bedroom when the warning was announced.

My new Olde Patina dyed wool is in the dryer and hope there is something which will work for the remainder of the background.  But, if not, I'll do what was done before....use what I have.

Saundra

Wednesday, March 7, 2018

What Went Wrong?

The results of this Olde Patina dye project didn't turn out as well as the previous projects and not sure what went wrong.  Did I use the wrong end of the dye spoon and use less of a color?  Did some of the wool absorb certain colors faster than others?  Did I mis-judge the amount of wool?

Olde Patina is my favorite recipe to give an aged look to wool; I've used it over flat wool and textures.  It is from the Beautiful Wool dye book by Laurice Heath.  The book provides recipes using both Pro Chem and Cushing dyes ~ Olde Patina uses Cushing Dyes.
Below is about 1 yard of pieces which went into one pot.
And here are the lackluster results.  
In another pot decided to dye the worms you see below.
Those worms were stuffed into a re-purposed onion mesh bag which has come in handy a few times.  It now has holes and had to weave a piece of wool to close the hole.  Guess it is time to purchase a bag of onions which has this type bag.
Here are the results, which I'm more pleased with than the pieces of wool.
So comparing the wool from the previous dyeing to the most recent, take a look.
The first darker piece of wool was from a previous dye job using Olde Patina.  The piece of wool to the right of that is from the same yardage but not nearly as dark as I'd hoped.  And the rest of the most recent dying is to the far right. 

For now I'll leave the wool as is and see if it can be used in my 1909 Horse rug.  But eventually it may go into a pot of dye again.

Happy rainy day from Delaware.

Saundra

Friday, October 6, 2017

White Pot with Olde Patina

With the recent chatter of people dyeing wool thought I'd pull out my white pot and do more Olde Patina recipe dying.  Since I do a lot of antique adaptations that color really speaks to me and gives more credence to an antique looking rug instead of an off white wool.

Below is the wool I stared with.  There is a little over a yard total of the 4 pieces and I used 6 Tablespoons of the Olde Patina recipe in the pot.  You can get the recipe by clicking the link near the bottom of this post.
The results from today are below and placed in the exact position.  All the wool was placed in the same big pot and in all honesty I was surprised to see the white wool turned out darker than the wool above.  Guess it depends on the fiber content of the wool.
Tho I do love off the bolt textures they sometimes present more of a  white in my rugs when hooked than I want.  Yup, I like the dirty worn look of the rugs from yesteryear.

Since there was only a small amount left from my previous Olde Patina dye day thought it was time to refresh my stash.  On the right side is all that is left from the last time I used the Olde Patina recipe.
What wonderful weather we are having yet the days are getting shorter and the we all know what will come after fall ~ uh, winter.  Have a great evening everyone and please....let's be kind to one another.

Saundra


Thursday, February 4, 2016

Horse Mat Adaptation Update

Yes, it's been a while since I showed you progress (or lack of) on the first of two horse adaptations on my frame.  Just didn't want to bore you so thought I'd wait until a little more was hooked.
Honestly, the red in the brown wool hooked in the horse doesn't stand out in person like it does in the photo.  

And in case you've forgotten what the original looks like here's a picture.  
Remember, am using up as many leftover worms as possible.  Those mish-mash of white, cream and tan worms were overdyed with Olde Patina for the background.  In the first picture they take on a yellowish color compared to the original antique photo.  But that's okay with me because my intent was to make mine look scrappy and use up leftovers which seem to multiply fast.

Does anyone have a topic they'd like for me to talk about?  Not that I know the answers but would be willing to research and learn too.  

Remember all that nice spring like weather I was bragging about and the crocus?  We are supposed to get wet snow tonight and those poor crocus and daffodils will be shivering.

Hope your evening is mawvelous and Lauren, have fun at Sauder the next couple days (I know you will). 

Saundra

Sunday, January 31, 2016

Rug Hooking Chit Chat and Jonas revisited

This is my progress so far on one of the antique horse mats.  This one I drew to the size of 15 x 16.  Looking at the photo the red/orange threads in some wool is showing where it was hooked at the neck.  Not sure yet if I'll pull it out and use the more brown wool or not.  But you know me, it will probably but the heck out of me until I do.

Also, if you read my blog you know I wanted a lighter tail but not as light as the original antique.   Plus the background is using a mix of light wool worms dirtied up using the Olde Patina dye recipe.
And in case you've forgotten what the original looks like here it is.  This is an antique rug so if any of you wish to join me in hooking one to the size of your liking, feel free.
The sheep rug still hasn't been completely bound but I should get busy finishing that up before there are two more mats to bind.  

Happily I've gained 2 followers; not sure if they were ones previously lost who opened a gmail address and came back or new ones.  But whatever the case am happy to see the follower numbers increase instead of decrease.

Last weekend the east coast experienced the wrath of the nor'easter Jonas.  Depending on where along the coast you lived depended on whether you received snow or rain.  When this nor'easter occurred it also happened to be high tide, high winds, full moon and loads of rain and snow mix.

As I live inland, it was snow for me. The news photo attached below shows a photo of what Mercer Avenue in Oak Orchard, DE looked like.  

The white lamp post to the right belongs to my mother's house.  Yes, she lived in a flood zone as her house is across the street from the Indian River.  If you enlarge the photo you will see the picture was taken after the water had already receded 12" - 15".

The other photo was removed as it didn't pertain to Oak Orchard. 
 
Now the great news is that my brother and I who used to worry about flooding in the house each time there was a hurricane or nor'easter, had just sold the house in December so it isn't our problem any longer.

Enjoy your Sunday.

Saundra


Monday, January 25, 2016

On Your Mark..... Get Ready.....

With one rug bound have started binding the sheep. But I'm really wanting to hook as I've not pulled a loop in days.  Think this is the longest I've gone without hooking.  

Have decided to hook both of these horse mats and put them both on the same linen to conserve linen.  But there is enough between them to have fold back foundation for binding.  As you can see I've sewn some fabric to the top and bottom to be sure there is ample room for the grippers.  The sides are fine.
Will hook the bottom horse first and wanted a dirty background like the original.  So back to my worms and pulled out the mixed whites and since the original antique rug has some red, green and dark colors in the background mixed a few of those in too.  
 Next they are put in an onion bag with the end closed, then went into a dye pot after soaking.  This is a cool way to overdye worms without them getting tangled.  And for drying I have a dryer that has a shelf which can be inserted so the shelf stays stationery yet the tumbler rotates to circulate heat.
I'm using the Old Patina dye recipe which is:


Olde Patina

1/2 t. Khaki Drab (Cushings)
1/8 + 1/16 Golden Brown (Cushings)
1/8 Old Gold  (Cushings)
1/16 t. Dark Gray (Cushings)
1/64 t. Wood Rose (Cushings)


I mixed up the batch in 1 CBW but only used 2 tablespoons of the dye solution in the pot.  The rest I put in a small jar and labeled it to be used when I want something old and dirty for an antique adaptation.

Here is the result of that dye job.  If you recall this recipe was used to dye over worms once before and I had a few left.
The previous dye leftovers are on top and the new batch is below.  They are all mixed in together now.  Funny how the color changed; the top photo looks really yellow but not so in person.
There won't be much progress to show tomorrow as I'm just now getting ready to start on the horse.  So if you have any questions or something you'd like for me to write about tomorrow, leave me a comment.

Hope you have a great evening.

Saundra


Sunday, November 30, 2014

Dyeing Wool Worms Without Knots

Most of us have them, some of us have more than others.  I find it very rewarding to use them up but some bright or white don't work in a worn look, particularly a Magdalena style rug.  Well, unless it is red ~ Magdalena used red in (I think) the majority if not all, of her rugs.  Guess those red union suits got used to the very end (pun intended).

While working on Magdalena's Olde Ducks noticed that my light and off white wool strips soon became either pinkish, yellow, bright white... in other words, not to my liking.  Soooo, it was time to pull out the dye pot and select a bunch of mixed wool strips to overdye.

I had a little of the dye recipe "Olde Patina" left from a dye job in readiness of hooking an antique adaptation I call "Cats Meow.  Since it worked so well with wool for that rug figured I'd overdye some worms with the last of the dye.  There was about 2 tablespoons of the recipe left, just enough to maybe dye close to half a yard.  But, it is a little hard to judge how much wool it is when it is reduced to worms.

I saved this mesh bag from my grandson's summer freezer pop treats knowing it would come in handy for a project such as this where it was important to contain the unruly worms.
 
Below you can see just how white some of my whites were ~ not a pretty sight in a rug if you are doing an aged look. 
The open end was secured.  I used the white clip first but then decided to add the twist as well.
 Here is the wool simmering with just one tablespoon of the recipe.  Since I wasn't sure how much would do the job figured more could be added vs. having it turn out too dark.  And it did need that second tablespoon of dye.
This is an old dryer but love the table that fits inside which allows for the heat flow but the drum doesn't move so the strips don't get tangled.
Next I put a piece of netting on top so no worms would fall thru the holes.  This is the comparison on results from my previous dye job for Cats Meow and the worms dyed today, pretty close I'd say.
The wool looks dark in the photo above, not only what I dyed today but the sample of what I dyed previously.  With dyeing the worms the raw edges of the strips absorb a bit more dye than had it been a half yard solid piece.  If you want to see how it hooked up in "Cats Meow", click on that link and it will take you to my blog post, you'll see it hooks up a mild aged background and I used all of those pieces of wool in the rug that you see stapled to the paper. 
 
Have a great Sunday evening.
 
Saundra