There are numerous ways to bind a rug and I have done several of them but not all. So far I have whipped with wool yarn, whipped with wool strips, wool covered cord, regular cotton binding tape and now with this extra wide cotton binding tape. I learned about this product from Polly Minick when she sent me one of her rugs for some reason. She said she buys it by the bolt and is a product that Floridians use on their sisal rugs.
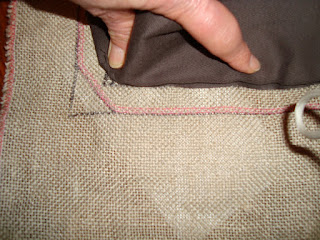
The first thing I do before I start hooking (IF I know there are no plans for enlarging the pattern or the border) is first do two rows of straight stitching and 1 row of zig zag stitching about 1 1/4" away from the edge of the design. I do this because it is much easier to put this stay stitching in before the rug becomes cumbersome and heavy with the wool strips and I like for the trimmed edge to be secure from fraying. You may also notice that I mark the corners at an angle to reduce the bulk for when the corners are mitered. So that corner is also about 1 1/4" away from the design.
Next thing was to draw a line 1/4" away from the rug design and lay the binding tape along that edge. Yes, I'm using another design as an example because I hadn't anticipated doing this tutorial earlier. Anyway, when butted up to the drawn edge I know that my 1/4" seam allowance will sew along the edge of the design and can hook up to that line for a straight hooking area and the seam binding is already sewn on and part of the work is already done.
Then you hook the rug, trim away the excess backing up to the secure edge and mitre the corners of the backing. I like to quickly stitch it closed so there is no bulk, or at least it seems to lessen the bulk.
I sewed the binding tape to each side of the rug and extended a smidgen beyond the real dimensions of the rug at the corners so there would some excess, better to have a little binding extra than have it be too short.
Next the cotton binding is turned to the back and the corners mitered as well. I play with it for a few moments, do some preliminary pinning and folding to see how much bulk I can afford to trim off. Go SLOWLY, as you can always trim away more later, because if you trim off too much you may end up being short. This photo shows where I'm folding.
Here you can see I have trimmed a little off to reduce the bulk in the corner when the cotton biding is mitered.
And here is what the one end looks like after mitering the corners and sewing down the one end.
The other sides need to be stitched down and then the rug will get another steaming. I will share a picture of the front and back of the finished project when it is done. And, if something needs more clarity, please feel free to ask and I'll update this message.
Thanks for visiting.
Saundra


Very confusing. Maybe actually doing it makes it more clear.
ReplyDeleteThanks for sharing.
Hugs :)
Lauren
Thank you for the tutorial,think I understand how to do it now.Hugs,Jen
ReplyDeleteHi there! Do you hook right up against the tape so no foundation fabric shows after the rug is done and tape is turned? In the finishing class I teach, that is one of the things I like to emphasize is that the foundation fabric doesn't show. I've not seen the wide tape ~ kind of interesting.
ReplyDeleteI am a new hooker so this is helpful for some reason I thought if I used the tape I had to use yarn to whip it! duh! Would you mind showing or if you have tell me where to find the post on whipping with wool. I understand the concept with yarn but the wool seemed so big and bulky but it would be so much more enconomical.
ReplyDeleteSaundra
ReplyDeleteThanks for the tutorial. I have to actually try it to understand it all. I think I have it though. I just did a small mat and did the wool over cording.....like you said, go slow when you cut. I left a lot of extra and then thought my gosh I have way too much here. Thought I measured it correctly and cut...only to find I cut too much. It was then just butting up to the other side but no overlap which is not what I wanted. I think I fixed it but hope I learned now not to cut until I am 100% sure....I was distracted and tired and it took 2 seconds to actually cut too much and then 2 hours to try to fix it! I swear I do live by Murphy's law.
hugs
cyndi