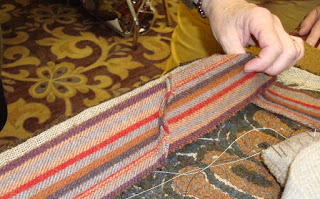
Betsy trims the foundation backing 2" away from the last row of hooking and does a running stitch all the way around securing it to the bottom of the rug.
In the photo above Betsy is showing how the gold wool binding hides the join seam and protects the foundation from unraveling (the other rug).
For the wool braid Betsy uses 2" ripped straight of grain strips. It can be three of the same color or a mixture of the wool used in the piece to be braided.
Again, they are straight of grain and NOT bias. You would need 2 1/2 times the length of the perimeter of the rug to cover with a braided edge. To lengthen strips the two pieces of 2" strips are placed at an angle to form an F and stitched cross-ways to get the look below. Sorry, thought I'd captured a picture of the before but if you are a sewer you already know. If not, then google 'joining strips of fabric diagonally'.
Here is what it looks like when the strips are stitched together. One continuous strip of wool to use for binding. As the sewing is at an angle it doesn't make a thick bulk at one spot and makes the transition of thickness ever so slight.
Below is how Betsy starts the braid... she pins the 3 strips of colors chosen and pins them together.
Then using a braiding attachment at the edge of the table starts the braid with a taught edge. As the braid forms in length will move the braid thru the metal clamp and continues. When I braid mine will probably go the cheap route and use an industrial clamp since I won't do a lot of braiding. Who knows, maybe after I start will choose to buy a clamp so it works right.
After get the length of braiding needed, it is then ready to attach to the edge of the rug. Betsy uses craft button thread which is a heavy duty thread. She catches the edge of the foundation and bottom edge of the braid.
Betsy starts in the middle of the long side of a rug and goes around until it meets in the center.
Below is another example of how she uses the wool binding to protect and conceal the foundation and braided edge. Her join is neat on the bottom and hard to detect.
Below notice how she pinches the butted edge together, using the same threat will stitch closed going back and forth until it is secure. Slowly and strategically she snips away at the edges of the join to be sure only the top parts lay over the raw edge of the wool.
Then she stitches the protective flap which hides those trimmed parts of the braid. The next step would be to stitch on the wool binding to hide the foundation which is still showing underneath the rug.
Below is a butted edge of a rug, can you see where the join is? Me either and I was there.
OMG, Betsy had SO MANY in progress samples to provide her students a step-by-step example of every stage. When I grow up I don't want to be a rug hooking teacher. I'd rather go to rug camp and play.
Betsy, Loved your class and hope to see you again soon.
Saundra


I have done one braided edge and it seemed harder if it is a square or rectangle rug is there a process when you get to the corner?
ReplyDeleteCathy
Great tutorial and I do love the look of a braided edge.
ReplyDeleteI do braid, so I need to try one. I usually serge my edges and then roll under and bind by whipping yard around the edge, but they seem to fall apart.
Debbie
Wow,, saundra!
ReplyDeleteWhat a great tutorial!
I have braided a few round chairpads over the years,,,, fun,,, love the end result,,
Thanks for sharing,,
love the look of a braided edge on rugs...the only way it will happen to mine is if someone else does it...
ReplyDeleteHi Saundra,
ReplyDeleteThank you for sharing this!! Great info and just love how it looks!!
Thinking of you today!!
Heart Hugs~
Julie
I like to learn how things are done, but I'm not enthusiastic about the braided edge. Thanks for the tutorial though. It's always fun learning new finishes.
ReplyDeleteHugs, Julia
It looks so pretty ...Thanks for sharing !!!
ReplyDeleteI did a chair pad with a braided edge, with Betsy, to learn her technique...I love it.
ReplyDeleteI have a friend who is an EXPERT braided of rugs. I told Betsy that this friend would not like my prim braiding ( she didn't) but I told her it was fine for me and I would continue to use it...in spite of her efforts to get me to let her do it " right"!!!!