I have done several types of rug binding ~ wool yarn wrapped edge with and without cording, Cotton binding tape, cotton pillow ticking as the rug tape, wool strip wrapped edge without cording, and wool covered cord. There are still other techniques that I haven't tried..... the Eaton edge, crochet edge or the braided edge. There are probably more binding edge techniques than those mentioned even. Anyway, I shall attempt to tell you how I do the wool covered cord bound edge; not saying this is the right way, but is how mine is done.
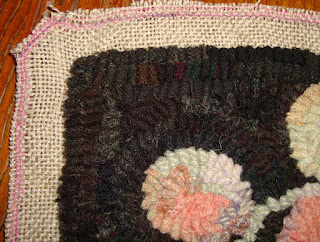
First thing I did after drawing the pattern was to immediately do the two rows of straight stitching and the zig zag stitch all around about 1 1/4" away from where the last row of hooking would be. I find it a lot easier to manipulate a non hooked rug around the sewing machine than a heavy one hard to move around. After it is hooked then all I have to do is trim away the excess and begin the steaming and binding task. You can see it here before it is trimmed.
And here it is trimmed away, notice that I angled the corner so there wouldn't be so much bulk in the corner and could be mitered and tucked more easily.
Next thing I do is cut wool strips 2 1/2" wide and since they have to stitched together you lay them on an angle and stitch across. If you look carefully you can see the white line I drew for the sewing line. You attach all pieces together in this fashion until the length is a smidgen more than enough to go all the way around.
Then you trim the corner away until you have just a 1/4" or so seam edge as can be seen below.
Then you iron the seam open so it is easier and more flat to work with. You will note that because of the angle of the seam (sewn on a bias) when you fold it over to enclose the cording there will not be the bulk of 4 layers of wool because it IS at an angle.
Now it is time to enclose the cording, I put on my zipper foot so that I can get up close and personal to the cord and wool. Oh, and I do pin all the way down a couple inches away from the other pin just to be sure to capture approximately the same amount of wool down the length of the corded binding. It is this side which will be placed next to the foundation edge and the rug top will lay on top but below the cord you see here.
I start the corded edge in the middle of a side rather than a corner. Corners need a little more attention so would not want to add a sharp corner to the other three nicely rounded corners. When I start I pin to secure the spot and then once I get my groove, the pins aren't necessary for me any longer. I hand stitch at the sew line on the cord binding and close to the last row of hooking on the hooked rug foundation and pull the thread snug so it doesn't work away from the rug. You quilters won't have a problem with this because you are used to stitching in the ditch.
Oh, something I forgot to mention is that I roll a piece of scotch tape around both ends of the cording so that it doesn't balloon up in size but is its nice contained and controllable size. Although I have not even gone half way around for the first round of hand stitching, this is how it looks right now.
It will look much nicer once the corners are prepared rather than the pillow effect you see here on the corner, then the binding part and mitering on the back has to be done, and yet another steaming. So come back to see how it looks finished. And this girl wants to get back to hooking on Wee Folk so don't expect the finished rug by tomorrow.
Thanks for stopping by to see what is on my frame and what's 'hookin'. TA TA!
Saundra


that is a very good tutorial!
ReplyDeleteThanks for the information.Your rugs are so beautiful Saundra, Hugs Cheri
ReplyDeleteSaundra ~
ReplyDeleteThanks for sharing, my most talented friend :)
Hugs,
Lauren
What size cord
ReplyDelete