Showing posts sorted by relevance for query ugly wool. Sort by date Show all posts

Sunday, June 19, 2022

THE WONDERS OF UGLY WOOL

Just before attending the first ever class with departed legend Barb Carroll I received a letter acknowledging the date of class and to bring only textured wool as she would not use flat wool even if it was mottled.  Prior to that I didn't have any experience using plaids, stripes, herringbone or checked wool.  Not sure if it was in that same personal handwritten note or another class, but also recall a note saying, 'bring your ugly wool'.  To me that was an invitation to all of her classes to find out how to work with some real uglies.

More than 2 decades ago a friend shared some wool with me that a friend of ours bought at a flea market.  A photo of it is below and thought it was the ugliest wool I'd ever seen...sorry Scotland.
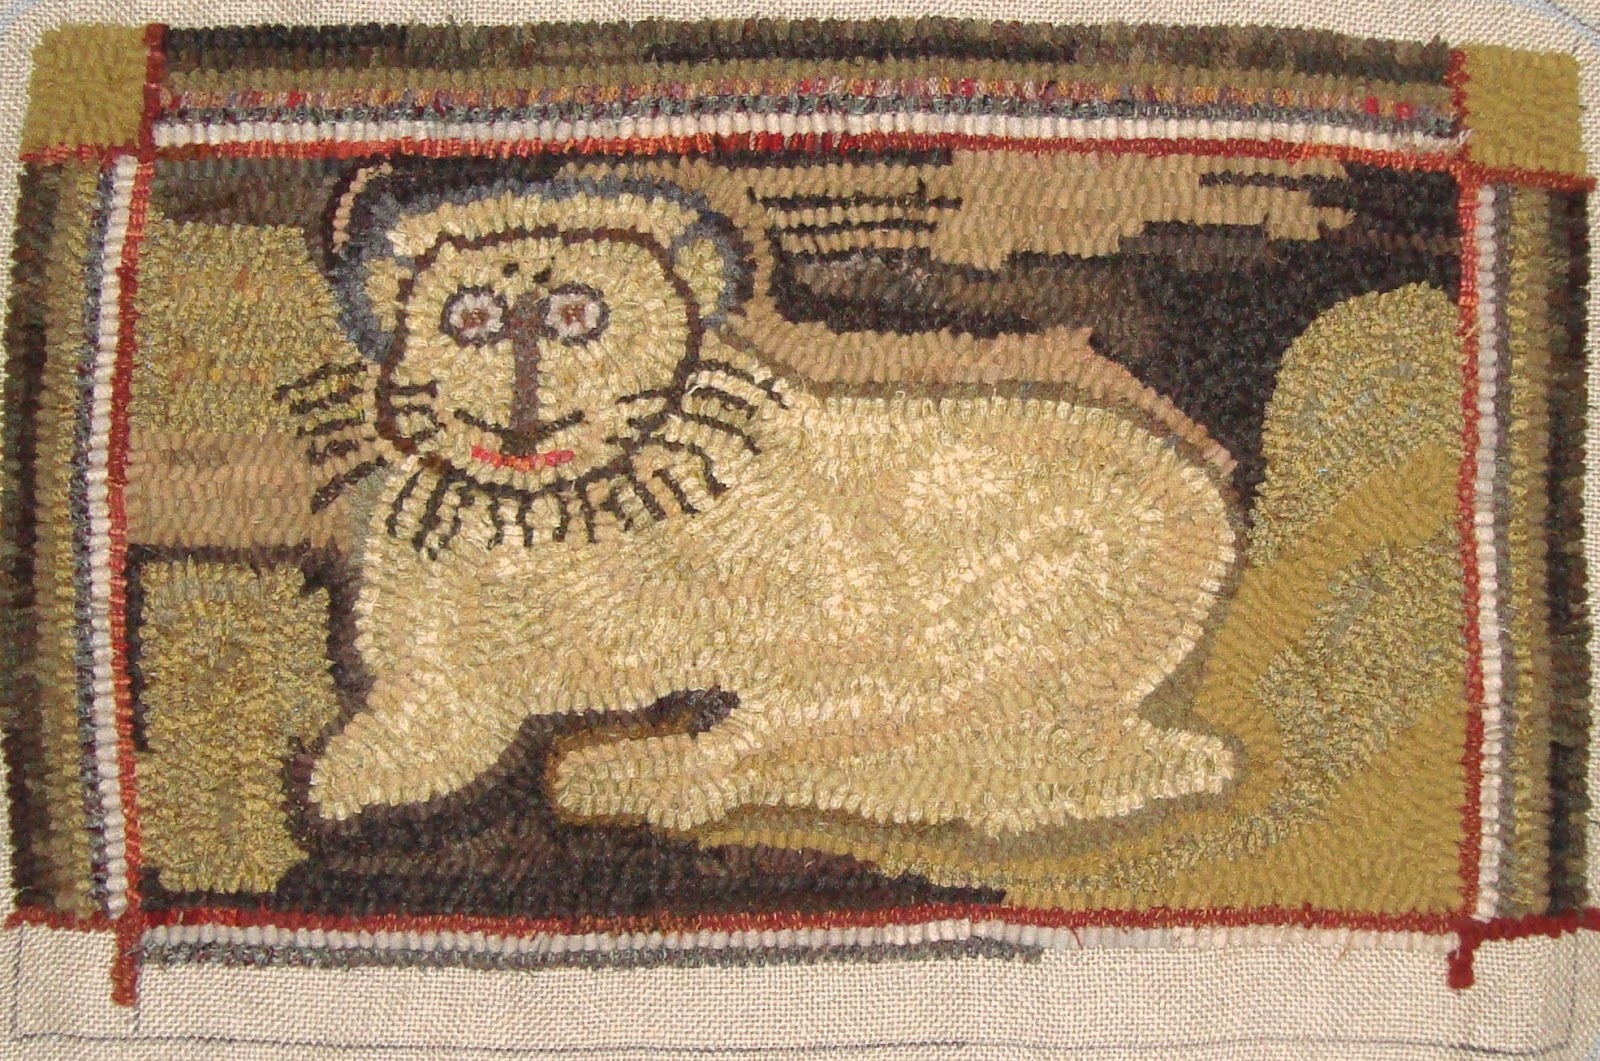
Barb did use it in color planning of Lion and Trees.  If you can't see it immediately, some places it was used are first row of hooking under the lion, the ovals in a couple stylized trees and a questionable image to the far right bottom.  
Perhaps not a prominent usage of the ugly wool but at least Barb showed me ugly wool can be used.  Fast forward 20 years and I still have that wool, gee, wonder why 😁.

As I'm working on Cottage and Apple Tree I'm wondering how the heck I'm going to pull off a close resemblance to the tree on the left.  
You guessed it, the ugly wool...but used the Scottish Huntsman and a few recruit strips from the worm bag.  Wanted so much to get more of the tree hooked and background around it but, you know...life gets in the way.
While it may not be exact it is close enough for my liking and happy to use up some of that perfectly ugly wool.

Yesterday was delightful to work outside so trimmed a big flowering bush which took a few hours of my time.  Hope I didn't kill it but it had overgrown so badly it needed it.  Today was another marvelous day to work outside and did some heavy duty work around that tree stump to remove root systems of several clumps of thorny vines and a twisted up root of a holly tree.  Was this a perfect day or what???  Hope it was in your area.

Happy Hooking.

Saundra


Monday, July 13, 2020

BEFORE and AFTER

Bespectacled Lion is all hooked but still needs to be steamed and bound.  There were some changes and will talk you thru my reasons for them.   

#1 ~The strip of off-white always bothered me from the beginning.  But hooked it in because the original antique had it and I try to replicate antique rugs as closely as possible while using the wool I have.  But I replaced that with a Scottish wool which Barb Carroll was crazy about.  More about that later.

This is the BEFORE photo which was the last post on the lion's progress.  
#2 ~ There was too much bright gold on the sides so changed that out with khaki which appears in the background and blends nicely with the green.

#3  ~ there was a curved khaki piece just over the lions ear on the left and it looked out of place.  Yep, on the original but I removed and replaced with dark.

This is the AFTER.
As previously mentioned it still needs to be steamed and bound but at least I'm happier and the border is done.  And...I've moved on.

Okay, here's the story on the wool which replaced the off-white.....long story.  My roomie Deb and I have a friend who loved going to community sales.  Since she knows we are rug hookers she picks up every yardage of wool she finds.  Sweet Deb shares with me and this was among the bounty.

Before one Woolley Fox rug camp Barb wrote a note to 'bring our ugly wool'.  Well I had a piece of ugly wool and thought this was it.  Barb LOVED it.
Barb showed me how valuable it was ~ ugly or not ~ and suggested it be put in the rug a few select places.  If you look carefully you'll see the spark on the ground under the lion in the primitive circles in the folage and stems from the ground.
So you just never know how important that ugly wool might be some day.  I even sought it out when I was wanting to replace the off white.

Bespectacled Lion isn't on my web site yet but I will offer it as a pattern.  Mine was drawn out 15.5 x 24 but will draw yours to whatever size you desire.  When the rug is finally steamed and bound it will be on my web site which is below.

Happy Monday, enjoy your evening.

Saundra
www.woodlandjunctionprimitives.com

Wednesday, April 5, 2017

Successes and Failures

Does this look familiar?  It should because the right side was a piece of wool purchased years ago (what was I thinking)?  It was on a recent blog post the results of this unsuccessful 'marrying' of wool happened.  
Since this rug hooker never surrenders to ugly wool today decided come hell or HOT water I'd remedy the situation to make it hookable.

The piece in the pot today was the one on the left and only semi acceptable so chose it as the victim.  Eventually the other piece of wool will be a target, but not today.

When I dye wool if there is some formula left I'll save the remainder of the dye in a small jar.  I keep it in the garage so it could go thru two seasons and the recipe could crystalize.  Of course it will make changes to the chemistry of the dye and results even after water is added but I went for it anyway.

In one jar which crystalized was a recipe called "Old Christmas Red". Sorry, but cannot remember which dye book it came from.  So added hot water and put it in the pot with the wool.  Some of the color did absorb but it was murkey (as one would expect after crystalizing). 

Did I submit?  Hell no....a more recent collection of left over dye was my favorite Olde Patina recipe from the Beautiful Wool dye book by Fredericksburg Rugs.
Above are the results and it really doesn't show the delicious old dirty color which I like putting in my antique adaptations.

Some of this wool WILL be hooked into the Magdalena Goat that I'm presently hooking and can't wait to get back to hooking on it.  

An addition to the post:.....  Jennie asked me how many times a piece of wool could be over dyed before it would felt.

My reply to her was that I do NOT boil my wool (I get it very hot and close to boil) nor do I take hot wool and rince in cold water shocking the wool.  Also, don't aggitate the wool in the washer.  Those three factors would be how you could end up with felted wool.

Ever see those pretty 'boiled wool' jackets?  How do you think they got that way?

Saundra

Tuesday, September 24, 2024

MY CAMP RUG

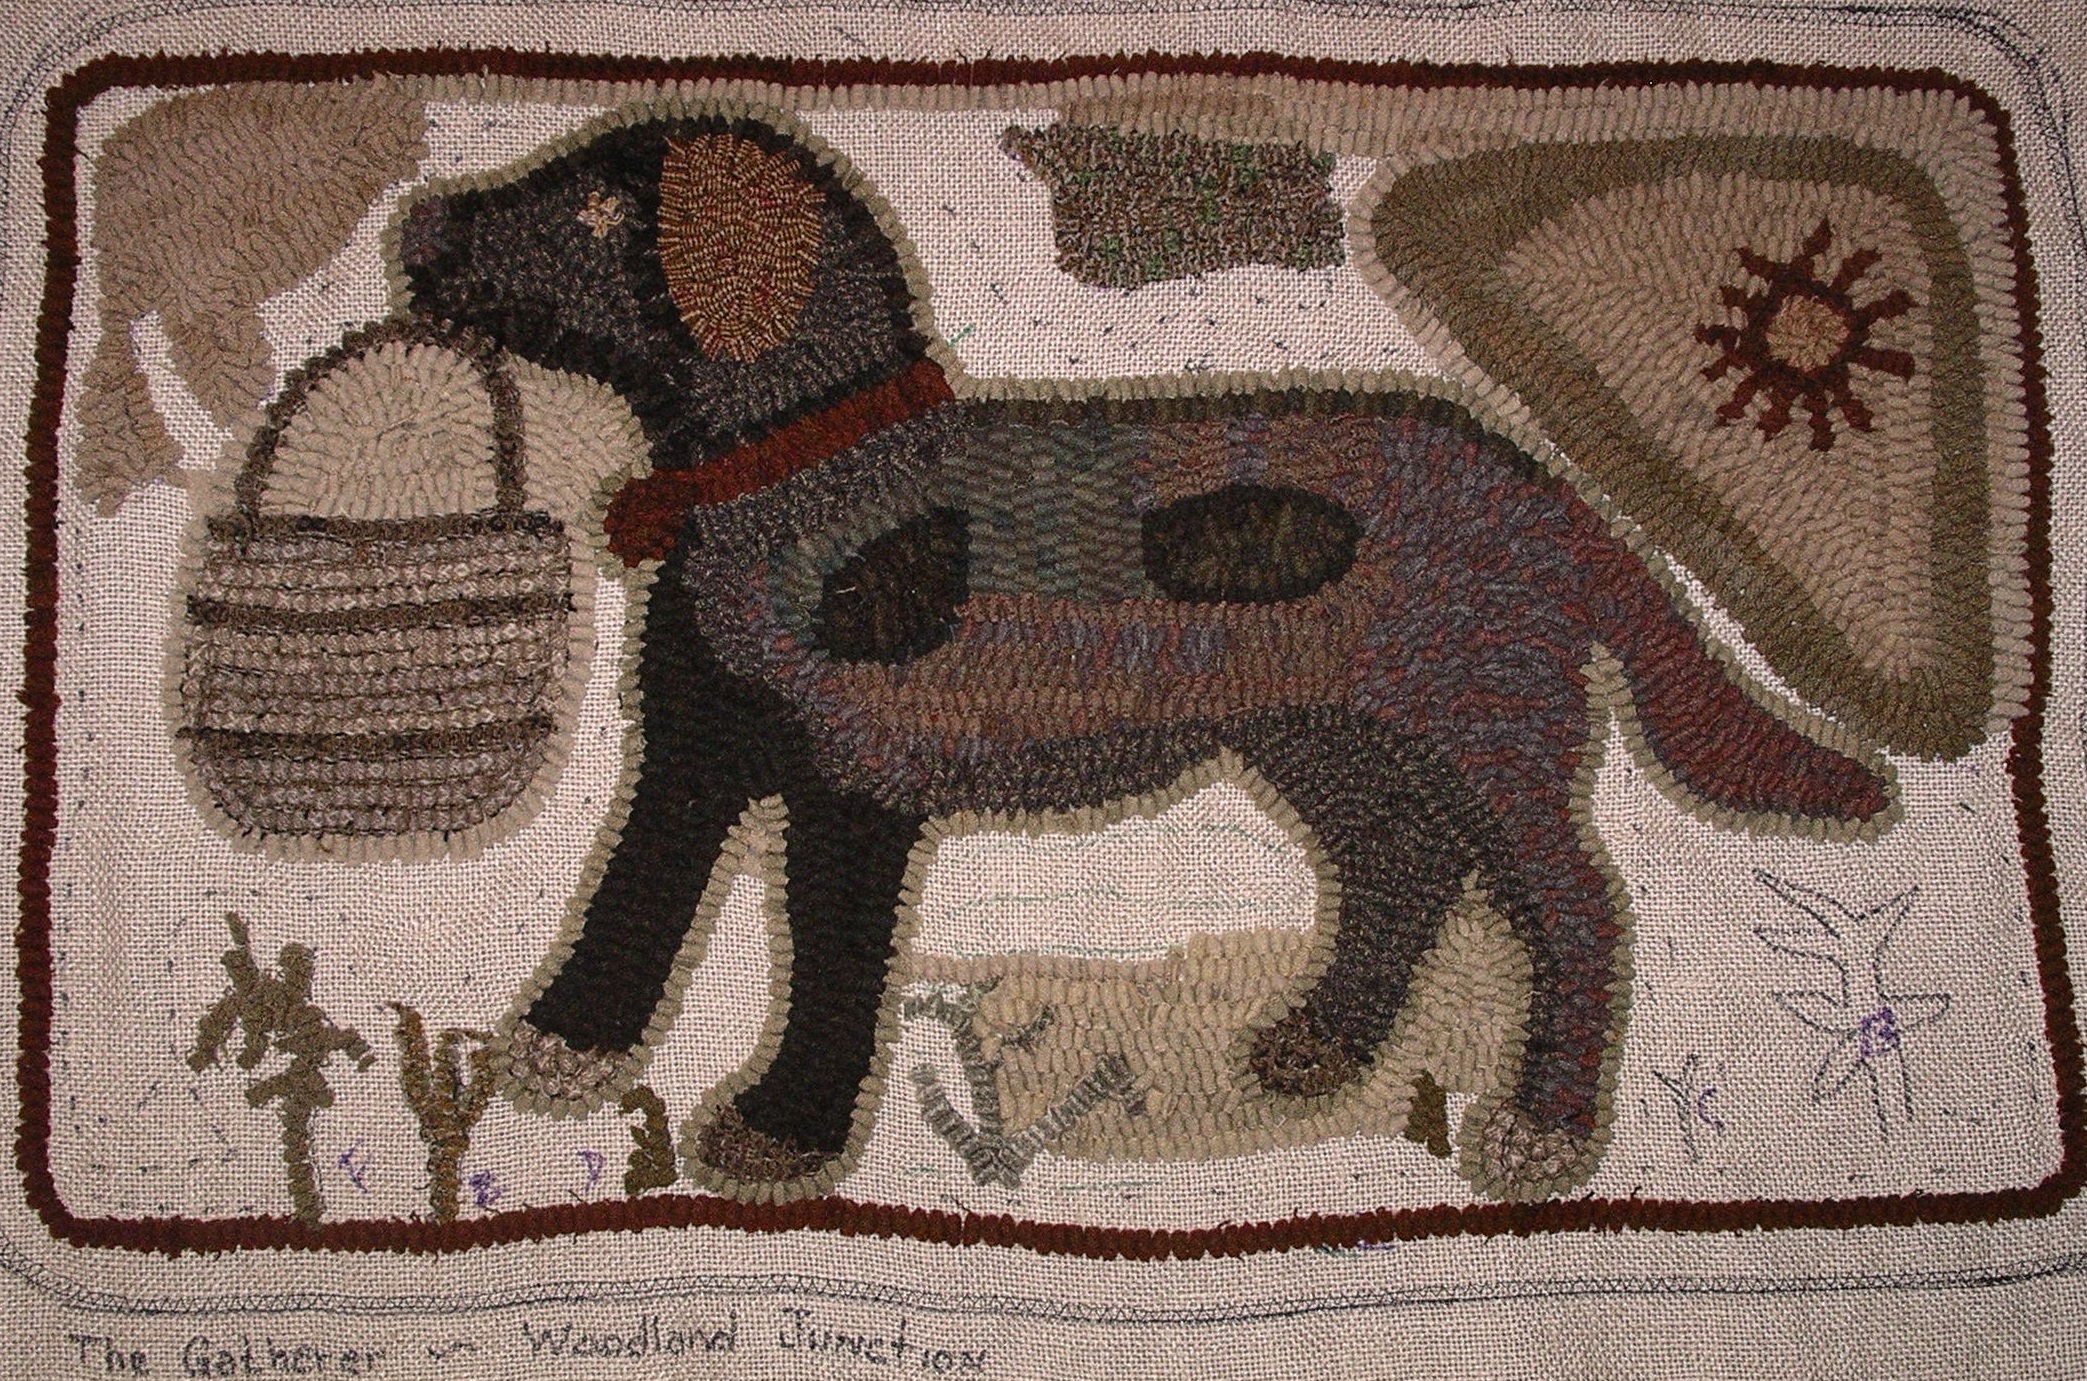
Lucille Festa was my teacher and don't know how she managed to have it 'all together' when she arrived.  She had just attended ATHA, then 400 miles away from home her vehicle broke down with transmission problems.  Yet she managed to eventually get home, restock her supply of wool, turn around and drive from Vermont to our class in Cape May, NJ.  Heck, I was feeling like a zombie after just 5 days of fun so she must be a superwoman.

What surprised me was the various wool Lucille chose for the dog from my stash ~ colors I'd never be brave enough to mix together, but she did and I like it.    Here's what the rug looks like and I'm quite happy. 
For those of you who read my blog, you saw this photo of odd and narrow pieces of wool pinned to a ring.  For the basket she picked that stripe piece which I think was a part of a poncho or some clothing I'd picked up somewhere.
The bottom plaid was another appearing in the dog which was surprising also since it has specks of shiny threads, also a piece of clothing which appears in the underbelly and part of a leg.  Below is another shot of the dog wool, basket and the ugly.  The other wool  missing in the photo is Rebecca Erb's Black Jack (Reversible Black).
And you will see a block of that 'ugly' wool (as I call it) with the green in it which I used in a tree HERE.  So when you attend a rug class don't be afraid to take those unusual pieces of wool, ya never know how it will look in your rug.  Lucille didn't recommend any of her wool for my project.  I had to just look and buy what appealed to me in order to bring home some of her lovely overdyed pieces.

As you can see from this photo below (the original antique), Lucille drew her own sections for me to hook since my chat with her was that I wanted to hook the rug how she envisioned it.  They aren't too far from the original lines tho.
I'd hoped to get this post published earlier in the day but I did a bit of reverse hooking on and around the basket.  Plus did a bit of yard work since that was neglected last week.  And now it's almost bed time.

Saundra

Wednesday, April 29, 2020

No Dye Supplies? No Problem ~ Marbleize your Wool

Years ago when starting to hook not only did I not dye wool but didn't  have a wool stash.  During the fall and winter went to the thrift store to purchase good wool clothing, dismantle, then wash and dry them to start my stash.  

At the time I had no clue about using textures as I hadn't yet had a class with the Queen of primitive hooking.... Barb Carroll.  So started collecting flat wool of every crayola color I could get my hands on.  Since Barb's classes I've given  away a lot of flat wool to beginners but still have some for 'just in case' and for marbleizing.

Recently follower Donna contacted me as she found a 2015 BLOG POST  about marbleizing but no results.  For some unknown reason I couldn't find the 'after' photos in my archives either and surely don't have old photos of them.  So promised I'd do the process again just for her.  Here ya go......

To marbleize wool you need 3 colors with the lightest wool sandwiched in the middle.  I decided to do 3 pots.

The first three colors are navy blue which looks black in the photo, bright yellow/gold and brown.
A bright blue, tan and olive,
 And plum ugly pink/red and bright red.
Karen Kahle published one of her small booklets several years ago which provides all the info on Marbleizing wool, which is in the photo.  Gather your twine and roll your sandwiched wool.  In order to take a photo and not have the wool unroll I put pins in it to keep the roll in place.  
 After you achieve the roll you secure one end, twist the roll until it coils up on itself. Then tie it all together.  It helps if you have a partner to help because you need at least three hands  to keep it secure and I only have two.
Then in the pots they go with water and a little detergent (without bleach).  I don't bring my water to a boil because I don't want felted wool but the water does get very hot.  The red pot had great bleeders but not the other two pots.
 
Not quite sure exactly  how long the pots were on the stove as I was doing laundry and other chores.  I'd stop at the pots and push the wool coils down or flip them over to release some dye.  Am thinking the pots were steaming on the burners for about an hour.  

Then I poured white vinegar in the pots as the mordant ~ Didn't measure but it was probably 1/3 or 1/2 cup in each pot.  Turned off the burners and let the wool steep in the water until it cooled.  Took the pots to the laundry sink, rinsed the wool a couple times, put the wool in my washer to spin the water out.

Tomorrow I'll show you the results.

Saundra
www.woodlandjunctionprimitives.weebly.com


Tuesday, June 6, 2023

BROUGHT OUT THE DYE POTS

It has been quite a long time since the dye pots were pulled out.  Not that I didn't want to dye wool but it is such a pain to pull all that crap out, locate the wool you want to change the color of, choose what recipe to use and see if you have those dyes.  I'm always in need/want of primitive black and have lots of unappreciated (ugly) wool which would be suitable for dyeing primitive black.

Sorry I didn't take a photo of the wool before, but this is the after.  Will tell you the plaid on the left was a grey plaid which turned out nicely.  The middle plaid was mostly green & light plaid, on the right was a putrid pink purple plaid which may have been part of a bargain bag purchase.  I love the bargain bags but am not a fan of pinks and certain shades of purple (sorry Barb).
The dye recipe used called for 1/2 yard wool but am sure I was over that since I didn't measure ~ sometimes I just wing it and hope for the best.  Despite that I'm pleased with the results and never expected them to be total flat black anyway.  Plus it is good to have some variation in a primitive black background unless you are a purist.  Here is the recipe used:

Primitive Black  (using Cushing Dye)
1/16 t plumb
1/4 t Khaki Drab
1/4 t Peacock
1/8 t black  over 1 cup boiling water

Since the pots, spoons and measuring cups are out decided to do more primitive black dyeing and will use the wool below.  The wool in the middle is very similar in color to the over dyed piece on the far right in the photo above.  This time I will measure the wool.
Here are the results of the next two pots of primitive black.  I did use up some of the red & blue plaid on the right  and will save the remainder of it for another dye session.  
I've put away all the dye paraphernalia and for now am over the dyeing bug.  Besides I didn't want to root thru my organized shelves of wool so only chose those which were easily retrievable.

Weather still seems to be rather mild for June and no rain here in a while although weatherman said "maybe" will have a little thunder and rain this evening.

Saundra


Wednesday, February 29, 2012

I Love Packages ! ! !

Oh boy, did I have a fun mail delivery, I received my partner's Spring Swap mat today.  This has been a very fun event and the second of four that is a part of the Sensational Seasonal Swap which I joined on http://groups.yahoo.com/group/Rughookers/.  For those of you who have been reading my blog you already read about the winter swap as I posted a picture of the snowman mat I hooked.
This is the great mat my partner sent me.  Along with the great wools, and the spun yarn which she used in the sheep which is pulling the wagon of flowers.  And, hey, check out those wool covered magnets.  I can use them to put on my linen to hold my scissors but decided to put them on my fridge door so I can see them whenever I walk by or open the door.    Thank you Barbara!!!!!!!  I love it all.


This is the mat that my partner received from me.  I also sent along some wools and chocolate to her.


I've already planned my Summer Swap piece but don't know yet who my partner is.  The wonderful Jo-Anne on the group takes precious time out of her day to host these various swaps.  She hosts 'ugly wool' swaps where it travels around to the locations of the participants where someone takes out something and puts something in return; then it is off to the next recipient.  But if you think about it, there's NO ugly wool. Yet, for someone who likes only brights a drab dark might be an ugly.  So bet'cha that dark drab wool would be my favorite since I like primitive.


Oh, it was also Jo-Anne who started the Sincerely Jane Challenge.  She is one enthusiastic rug hooker and does a lot on the group to keep us an active group, focused, interested and challenged.  So whether you just read, participate, post, or whatever, here is the link to join.  But please be sure to read the messages on the home page.   http://groups.yahoo.com/group/Rughookers/


Friday, July 20, 2012

Sensational Seasonal Swap

Last year on Rughookers group dear JoAnne Harris offered to host a seasonal swap for anyone who wished to participate.  Now this is no easy task to undertake because she would gather the names and match people up differently for each four seasons so that we had 4 different friends' mats at the end of the year.


JoAnne would also come up with creative ideas on sizes and themes for yet other swaps.  She is the one who suggested the Sincerely Jane challenge and has followed thru with that so we will be published in a future Rug Hooking Magazine article.  And, a couple years ago she hosted and started an "Ugly Wool" swap so she put in several pieces of different wool (textures, over dyed, etc.) and a trinket and she sent it on to the next person ~ so around the states and Canada it went with accolades and excitement shared on the group as each person received and replaced what they took out with something in return.  Now, what I consider ugly might be the heartbeat to another hooker ~ besides there really isn't any ugly wool.  So you can see that she is a creative and generous soul for a woman who works full-time and is continuing her education....anyway.....


I have finally pulled the last loops on my Fall Swap Mat and don't know who my partner is yet so am hoping she (or he) will never see this post and know before hand what they are getting.  No, I haven't steamed it yet... maybe tomorrow.  But it is still show able here.  I prefer wide cut and primitive styles however I have done one narrow cut pieces of my departed Rottweilers which I am proud of.  So fun for me is hooking nothing smaller than #8, which is what this mat is hooked with.  This is a design by Lori Brechlin of NotForgotten Farm.
And, these are the other swap mats that I hooked for other seasons.  We started with the winter swap first and this was my contribution.
Next was spring and I chose to hook a robin ~~ "the early bird catches the worm".
Then summer for me was what I remembered living near the Atlantic Ocean and near the beaches of Rehoboth, Lewes, Bethany Beach, Bowers Beach of DE, Ocean City, MD all within less than an hour's drive.  So summer for me was a beach scene.
If any of you wish to participate in this easy 8" square seasonal swap, join the group as JoAnne has graciously offered to extend it for those folks who joined later and wish to get the additional seasons.  You can read all about it on the group archive postings.


Thanks for visiting.


Saundra


Wednesday, December 14, 2022

HUNTING TIME

I'm still working on another flower but it is hunting time once again for the next rug for my frame.  The idea of hooking a block from Lucinda Ward's Reconciliation Quilt is still on the table but that won't occur until after the new year when Christmas has been put away and folks have time, right Lauren 😁.

And I did draw out a pattern today but it wasn't for me. 😞  Someone ordered Cottage and Apple Tree pattern and always try to get them in the mail asap.

The rug below was recently found and before I did the screenshot thought for sure I'd noted the date and dimensions.  Well, can't identify any scribbled notes so guess I forgot.  Eventually I'll see it on pinterest again and follow the trail to hopefully take notes and document.
This great rug was found today, a Horse named Mabel dated 1917.  It measures 41 x 45 and  sold for $9,400 Oct. 2000.  If I hadn't hooked one very similar this would definitely be on my frame right now.
Here is the rug hooked several years ago which is very similar to the one above.
The Folk art horse rug below has been posted on my blog before.  It measures 36.5 x 52 and sold for $1,690.  At one time I was interested in hooking it but that interested fizzled out before drawing it.  Will think about this as a choice again.
I've posted this star rug previously also and now that I'm looking this one seems interesting.  Don't let that pattern maker's name on the bottom of the picture confuse you; she doesn't have a copyright to this design as it is in public domain circa 1900.  She just imprinted her web site link at the bottom of the picture.
This beauty is also being auditioned for the role of my next rug and I've been interested in this design for a while.  Cogswell's 4-petal flower is hooked with cotton and wool on burlap.  The original measures 31 x 45 and said to be hooked between 1890-1925.  I have some ugly wool that would be perfect.  If you recall, I've posted before how ugly wool makes a great rug.
Finally found it....Abe Lincoln, his horse and cabin.  AL1809 represents the date he was born.  US 1861-1865 for is years in office.
The search for my next project will continue but it is getting late in the day and want to make a post so will sign off for now...TA TA.

Saundra


Monday, January 28, 2019

Love Hooking ~ Hate Binding

It has been a couple weeks since the last loop was pulled on Star Geometric.  It has been steamed, foundation secured, trimmed and ready for the final stage.
Binding a rug isn't hard to do but it takes time away from hooking another rug.  

I've done several types of binding and have posted several ways on my blog previously.  Sometimes (most times) I don't want a whipped edge as the additional row of color isn't always what is wanted.  Plus, I've whipped the edges with wool before and it doesn't take long for the wool yarn to separate and show the foundation.

Gritting my teeth I've started to bind the rug.  UH, taking away from my hooking time !#*?!  

This is how I'm binding Star rug.  Am using wool yarn but won't be whipped where that edge provides a part of the border and shows at the top.  But rather whipping which will be at the bottom to provide strength and support at the edge.

Notice I've placed the rug binding about 1/4" inside from the edge and did a running stitch to secure the binding tape to the rug's foundation.    With wool yarn I whip by placing the needle under the row of hooking and upward into the cotton binding.  

Was using single wool strands but now see I should have used double strands.  So that will change when getting back to this undesirable task, 😀
This is what it looks like from the top view.  No extra border and no wool yarn showing at the top.
On another thought and wool in my stash....that ugly pinkish/red wool is still driving me crazy and need to do an over dye.  But that will be in my future as I've an appointment tomorrow and need to get back to the Magdalena rug.   OH, will be making a pot of vegetable soup tomorrow also ~ so guess my tomorrow is full.

Weather is going to get crazy here soon, coming from you mid-west folks have it rough right now.  

Happy Monday.

Saundra

Tuesday, March 26, 2013

A Smidgen of Progress

I've only made a slight amount of progress on the Red Bird of Pennsylvania.... sorry for a boring showing.  But I have a good excuse ~ a hooker by the name of Karen took my offer to hook along with me so drew out the design for her and shipped it yesterday.  Karen doesn't have a blog  for you all to follow but said she would send pictures of her progress and when I get those will post on my blog. 

While this design was not in kit form I did tell Karen that I'd send a strip of wool intended for the berries and bird.  The rest I'd planned on pulling from my worm collection.  So, here is what I've accomplished so far... uh, not much....the limb the bird is on was an over dyed reject but when planning for this rug it looked quite appropriate.  SO NEVER, you newbie dyers, don't EVER throw away ugly wool.  You just never know when it will be the perfect wool to use.
And here is the photo showing the wool for the berries, bird and the inside wavy border.  The primitive black background will be various worms from my collection. 
So if anyone else would like to follow along, the pattern would be drawn on Dorr Natural Primitive linen with the measurements of 18 x 35 for $65 plus shipping; email me HERE.
Have a great evening everyone.

Saundra

Monday, April 22, 2024

TIPS TEACHERS TAUGHT US

The other day I emailed follower/reader Denise and asked if there was something she'd like me to blog about.  As any of you who have a blog know, sometimes we (or at least I) struggle to come up with a topic which might interest readers.  Her question was "wondering what was the best tip learned from a class or teacher".  

A comment from Julia made a perfect and classic example of 'must do' ~  Use a good linen foundation and not cheap brittle burlap for your rug hooking.  Must admit that when I was teaching myself and practicing that is what I used because it was affordable and could be a 'throw away'.  But when I got seriously hooking that was the lesson taught me also and is what I use.

Continuing with Denise's email, she said she was struggling with a random background.  When hooking a large background we all get bored!  I'm speaking for myself here but know someone (UH, that would be my friend Lauren) who finds it a soothing task.

When I first started hooking think I just followed the outline of the main motif's (the ripple effect) until the lines eventually connected and then filled in.  But attending an early rug camp my teacher Bev Conway suggested drawing, then hooking, S's in the background, hooking the S, hooking around the S, moving onto the next and as each S is hooked around they eventually meet up.  

This Rottweiler Memorial wasn't hooked in her class but I used her technique.  You can see the S or C movement throughout the background and I used two values of the same color wool.
Another teacher Lisanne Miller suggests the puzzle piece style.  I tried it on my eagle rug but didn't do her technique justice as I didn't draw the small areas on the background, I just hooked random spots using dark and different wools.  It is a primitive after all.
 
Reader Nancy commented on my last blog post that her teacher suggested adding small bits of color or different value here and there for interest.  

Robin mentioned using 'ugly wool because ya just never know when that ugly will look wonderful in a rug'.

Barb Carroll made a similar comment in class.  Barb's was more of a color contrast which she called 'poison' as a random out-of-place hooked piece of wool.  After all, they used what they had back in the day.  An example of Barb's teaching is in this Westmoreland Ponies pattern designed by her and I hooked it in a class with Barb 2012.  Click on the photo below and look closely.  You can see the odd yellow green strips, random plaids and even a lighter color in the background.  All of which provides interest and makes the eye move around the rug.  AND, makes it more fun for the hooker.
Westmoreland Ponies is a free pattern in a previous issue of RHM but can't recall which year but maybe around 2011 or 2012.

Please don't hesitate to email me a question or an idea you'd like to see on my blog.  Happy hooking.

Saundra


Sunday, April 19, 2020

Sunday Happenings Here

On a perfect Sunday I'd be on my way to Ocean City, MD for rug camp.  But not this year.  Hope like heck all is well by September so Rugs by The Sea takes place as scheduled.  However I probably will still carry a mask with me.

Moving along........I was envious of Lauren's accomplishments of dyeing wool particularly since I have some of the same butt-ugly brown and cream plaid wool she had and I've never used.

Decided to over-dye the wool using two different recipes:  1/4 yard with Lauren's Fraktur Black and another pot using Tonya Robey's Evening Shade.

I gathered my Cushing dyes and proceeded to open up a fresh envelope of Dark Green for the Evening Shade recipe.  Say what?  Did someone make a mistake and put the wrong dye in the envelope?  So went to my stash of dyes but that was the only package of Dark Green here.
Oh well, it looked more like a shade of blue/purple to me but what the heck......I put dye in the cup, added 1 c boiling water and took a leap of faith.

Here are the results and in the center the wool used.
 On the left of the original wool is Evening Shade, on the right is Fraktur Black but mine didn't turn out like Lauren's (I'll go borrow pictures from her blog am sure she won't mind).

And on the bottom are two small pieces I added to Evening Shade when I didn't think it was going to absorb all the color.  For you non-dyers, here is an interesting fact for when you decide to dye.....not all dyes absorb at the same rate.  As the wool and dye mix had been in the pot well over 30 minutes when the small pieces were inserted, it appears the black and the Dark Green absorbed faster than Seal Brown.  That is why that piece looks  more brown.

Here was Lauren's before photo but her brown and cream plaid looks darker than mine...
And her after photo using Fraktur Black.  Her results look more grey and mine more brown.  Could it be the camera, is it the water?
Whatever it is, the wool I dyed today will be used whereas it would not have been the way it was.  Thanks Lauren for inspiring me to dye.

Saundra
www.woodlandjunctionprimitives.weebly.com


Sunday, September 29, 2019

Rug and Dyeing Chit Chat

After the last blog post I temporarily set aside Oh Glorious Day to pick up Glazer Antique Hearts again.  It is sorta nice having two rugs going at the same time but wouldn't want more than that.  But today decided to take a brief detour even from that.  

A couple years ago a friend gave me several yards of wool.  Wasn't fond of the color but a hooker never turns down free wool, especially on the bolt.

It was a bright fuchsia color and I wasn't fond of it.  Gave some to pal Deb and the rest has been sitting on the bolt in my attic.  Don't know if Deb ever used hers but I haven't cut one strip and thought I'd try to make it more palatable for me.  See, told ya it was a bright color.
Here it is soaking.
When I poured out the wool and water the wool had bled quite a lot.  Hmm, I've more ugly fuchsia wool so could marry it with something else lighter in color and see what I end up with.

I decided to use the recipe "Indigo" from Tonya's dye book A Rug To Dye For.   Chose that recipe because if it turns out to be an eggplant color I'll be happier than what it looked like in the beginning. 
The wool simmering on the stove in Tonya's recipe.
And here are the results of the before and after.
The color results after the dye bath is much more to my liking.  Don't have plans for it yet but will be put on the shelf in the wool room as a potential for future use vs. the attic.

Saundra