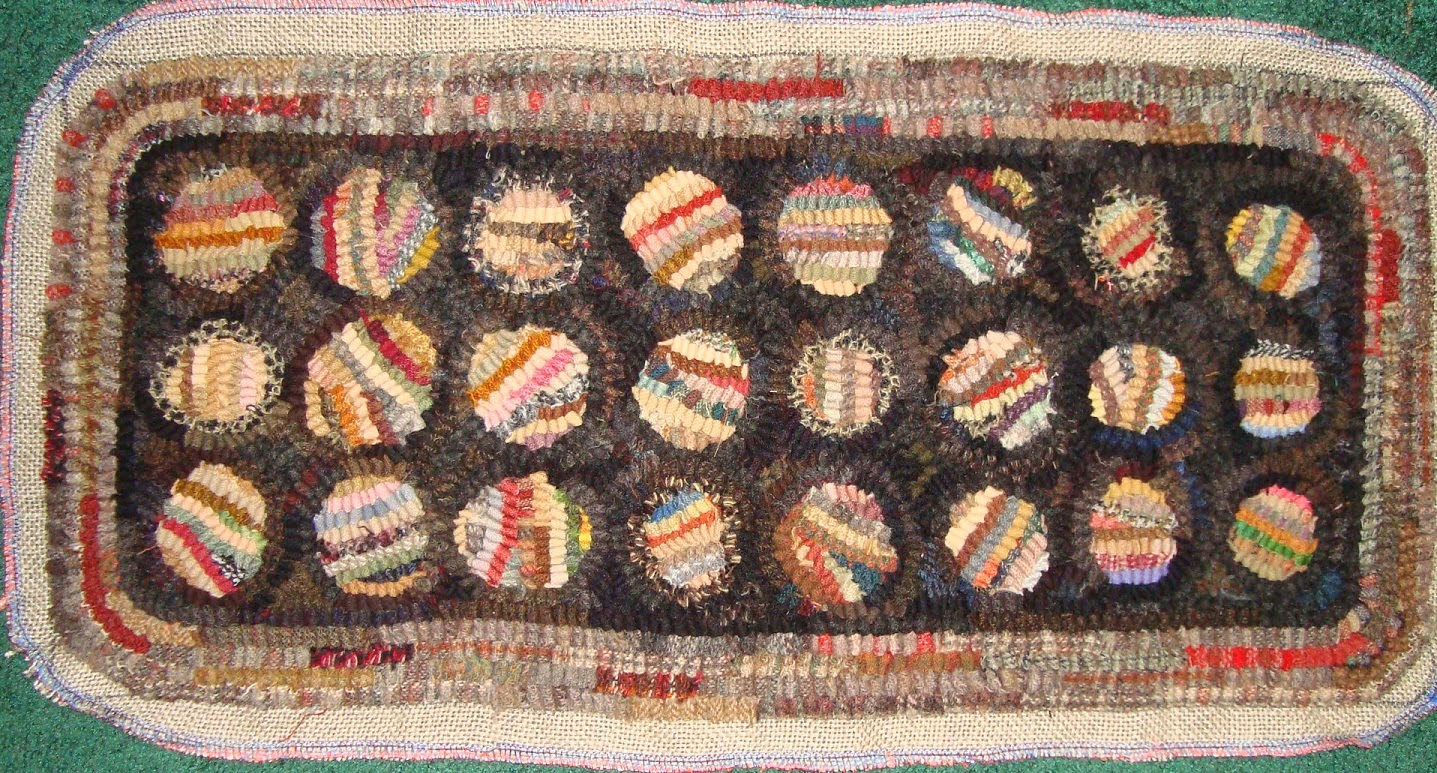
At least the entire post is about hooking albeit talking and this and a little of that. The circle mat has been completely hooked and given it's first steaming. It has even been trimmed and serged 1" beyond the last row of hooking.
Eventually I'll get around to giving a tutorial with binding tape showing 'how to' with the curved corners. But that is in a near future post.
So then it was time to clean up those pesky but usable leftovers which had collected once again. I had reduced them from the huge web tote which was stored for years with the Granny Geometric. So that rug hooked those were separated out. But then found another basket with leftovers in it which were instantly redirected to the circle rug. Now that the circle rug is hooked this is what I gleened from the leftovers this morning over a few cups of coffee; you can see the empty basket in the background.
Then into the appropriate colored baggie they went to be useful once again on another rug. This was time well spent as it is a great resource when you need a certain color and don't want to pull out yardage to get a couple strips. However, the first time around was a struggle since I'd waited so many years before separating them out.
Sometimes, if I've precious little of a certain wool that I like and it is on the shelf I'll fold the strips and insert them into the middle of the wool. That way I don't need to search through my spaghetti string wool strips to find extra.
Plans were to also post a picture of the vintage Cat rug to show my progress but think I'll hold off until next post in order to get more hooked.
OH!!!!!! speaking of the Cat rug.... remember my post of 'dying in anticipation'? Click on that previous link if you can't remember. Anyway, most of that wool (if not all the wool) was purchased when Heavens to Betsy had their remnant bag sales.
Well guys and gals, while they last the remnant bag sale has started. So click on Betsy's link and grab yours before they are gone. This has been a fun time to get larger samples of wool they have without buying yardage, and also fun to do what I did by have a variety of wool to overdye in the same dye pot. Check it out.
Have a fantaboulous evening and please be kind to one another AND to defenseless animals.
Saundra
Before I start writing about different types of wool I'll give you an example of how a textured wool can and will work in even the most precise hooking project. I'd never have believed it if it hadn't happened to me.
Here is my dearly departed Shadow girl which was hooked last September at Cape May with Diane Stoffel.
The wool taken for Shadow was some dip dyed (flat) wool dyed for my Rottweiler Memorial some years prior so the colors were appropriate. Also took some textured blacks/darks. But sadly my stash for the over dyed wool was running out and there was way more to hook on Shadow than I had taken to camp.
So Diane took me shopping (at camp) to find a suitable wool to use for Shadow's unfinished face since I'd used up all my over dyed wool. OMG, her face. You have no idea how frustrated I was having to make the switch.....well, if you go back that far in my blog you will see my ongoing struggle. So this is the wool Diane chose (the plaid), and I used the light section for some parts and the darker for the darker parts of Shadow.
Interestingly enough, it worked just fine. And if you look with a critical eye you will see the variance in the photo below.
So, would I have preferred having enough of my over dyed wool? YES! While it is only a hooked piece it was a special girl of mine and I wanted her to be hooked as I'd planned. But I'm pleased with how she turned out and Diane made a dang good choice! I'd take another class with Diane Stoffel in a heart beat!!!! She's funny, good at what she does and her color wheel lesson is off the charts fun.
To continue....when first starting my journey with rug hooking and having absolutely no stash I, as most of us, resorted to the thrift shop. I mean, why would I spend good money to buy wool yardage when it can be purchased for much less at the thrift shop and just for the washing, drying and dismantling of the fabric?
My first mistakes were:
~ buying clothing with any percentage of wool no matter how little
~ buying flat colors and no textured (check, plaids, herringbone, etc.)
Some of that wool did serve me well during my practice (struggle) but as my rug hooking experience matured realized that a significant amount of wool in my stash was not usable. You see, I'd never been to a rug camp before, didn't know any other hookers in my area so was self-taught. And now there is the Internet where other hookers communicate on groups and blogs if you aren't lucky enough to be able to go to a rug camp.
The preferred wool is 100% wool but even then you need to be careful to NOT buy WORSTED wool. Worsted wool is a process which makes the wool thread, will not full even when washed with tennis balls. It is worthless.
Don't buy wool with Polyester but it is okay to buy wool with 10% nylon as it will accept acid dyes and won't harm your cutter. It is also a luxury if you find clothing which has cashmere mixed in. Ooh la la... it makes it very soft. I've purchased some clothing with which was 85% wool, with cashmere and nylon making up the other 15%. It has a feel which I can identify if my fingers ever touch it in my wool basket.
Then once you take it home do not take it into your home until it is ready to be washed and dried. That way you don't bring in unwanted moth eggs. I would usually dismantle the clothing out on my back deck or in the garage if too cold outside. Then take it in and wash it on warm and dry on low with a couple fluffy towels.
Have a great evening folks and if any of you newbies reading my blog want to ask questions please feel free to write me at saundra125@comcast.net. If you post your question on my blog and you happen to be a "NO-REPLY" blogger I'll not be able to respond. If you want find out if you are a NO REPLY click HERE.
Saundra
Oh but I was hoping to have all the background done on the right middle around the kitten and bird but didn't get it done. So I hooked in the colors for the areas I've planned. Must say here that the dye job I did in anticipation of this rug has been delightful to use. If you want to see what I did click HERE.
Okay, so my plans are to finish the right side middle of this rug and then save it until the circle/penny mat is hooked. Therefore I'll be flipping between the two rugs again so I can save some hooking on this rug for the evening arriving at Woolley Fox plus give me something to work on until Barb gets to me for color planning my rug. I'll debut the rug planned for Barbs in a future post. So hang tight and check back.
Have a great Sunday evening everyone.
Saundra
When I first started my blog it was with intentions of motivating newbie hookers so they didn't feel alone and help them along without the struggle I felt during that new adventure. Well, that is until I found rug camps and other people who shared the same love of hooking as me. Then I didn't feel alone any longer.
Sorry I've been absent, but the delay in my posting was due to lawn mowing, weed pulling. Oh... weeds!!! Today I found numerous tunnels of those sharp spiky briar tree like things. Don't know what they are called but I HATE THEM, and never could understand why God made those or mosquito's.
Anyhoo...this is what my 'circle/penny mat' looks like now.
Hopefully the next time you see this rug it will be fully hooked. I'm having a lot of fun hooking the vintage cat rug so will have a struggle switching since in two weeks is a great rug camp with Barb Carroll and start something new. EEKS, that means I've got this small mat to finish before I go to Barbs for sure. Oh my but the pressure is on now.
Have a great evening.
Saundra
I'd really hoped to have more hooked by now so apologize if you were looking for more progress.
This will be a short post since I'm making soup late due to 'life' getting in the way. But for you newbies please remember to:
~ hook inside the lines to keep the motif a good size and not grow
~ do an outline row around the motif to keep it contained
~ and I like to hook the outside perimeter line and you can see it going up the far right side from bottom up.
Have a great evening everyone and try to stay dry.
Saundra
As I've proclaimed many times, binding rugs is not my favorite thing to do but a necessity if you want to display the rug or sell it. Now there are two left to bind ~ the Santa and Deer adaptation and the Granny Geometric.
It is the Santa getting the attention now. I am using a wide cotton binding which is sold by NC Carpet and a product Polly Minick told me about. This time I cut the binding in 4 sections and stitched on each end. In a post a while ago, the wide binding tape was attached differently. You can check out what I did before by clicking HERE. Oh dear, I see that Santa needs a little spark in his eye and/or a dab of black as his eyes are too washed out. Totally forgot until I looked at this photo.
This time I was lazy and didn't bother hand stitching close to the rug edge; instead I machine stitched it using my zipper foot and did this after the rug was hooked. Here is a close up photo.
And I will mitre the corners and stitch down.
This wide tape has lots of uses and could be used as a great sleeve for hanging rugs too. I'm considering buying another roll of another color and perhaps a bit smaller. Sometimes I feel the 1 1/4" binding tape isn't quite wide enough.
Tomorrow I'll have an updated picture of the Cat rug to share with you.
Folks, it feels like fall out there instead of spring ~ it is dreary, chilly, rainy and the heat is coming on. Wish it was warmer but at least it isn't snowing.
Have a great evening.
Saundra
Won't bore you with the LONG list but just suffice it to say it has all been rug hooking related. But the short list is that all the wool is packed and ready for the Woolley Fox camp.
Figured it was about time to pull a couple loops on the Hooked Penny Mat so here is the present look. After this small task think I'll just let my worms multiply and not worry about using them specifically in a rug (my granny geometric) or this small penny mat.
And yes, I've been hooking on the cat rug so hopefully there will be a little more progress to show when I post again.
The weekend went by ever so fast and can't believe it is Monday tomorrow.
Saundra
First I must thank everyone for the compliments on the binding technique of the Chicken Challenge rug. Yes, I performed the task but it was Betsy Reed who taught the technique (thanks Betsy). AND, Jerry B, thanks for your delightful comment about my blog. I so much wanted to reply to your comment in a personal e-mail but you are a "NO-REPLY" blogger. If you want to know how to fix that do a 'search' on my blog or on Google to see the minor thing you can do so people can communicate to you.
Okay, okay....it is time to show the update of my present rug.
I've decided to let go of the angst as to whether the colors are compatible, if the hues or intensity work together and what a teacher would teach. Years ago women made do and used what they had. They didn't give a hoot whether colors worked together or not, they needed a bed rug, a floor rug or quilt. AHHHH, so now think I can forge on and think I'll enjoy hooking a little better without the worry.
BTW, in case you haven't wondered... I'm my own worst critic (enemy). Have a great evening everyone and be kind to one another. HA! And be kind to ones self. I could take a lesson from that for sure.
Saundra
Yeah, I've taken a break from working on the vintage cat rug in order to bind the Chicken Challenge rug. Since a few girls shared their Chicken Challenge rug with Barb Carroll when they attended her camp I wanted to take mine as well but it needed to be bound first. Click the link above if you want to see how to join the Chicken Challenge for free and get the free pattern.
After hooking the piece and after preparing the foundation wasn't sure how I wanted to bind it. But when push came to shove and it was time to do the deed knew what I wanted for my dear chick. I decided to use a primitive technique taught by Betsy Reed last November when she taught class. Actually I used the same technique to bind the pillow rug hooked in her class and you can see that in the blog archives this past December or January.
Here is my li'l chick rug all hooked and finally bound. I thought this would be a great way to bind the rug and the little white whipping all around sorta frames the cream chicken in the center. I love it.
The binding fabric is 100% cotton ripped at 2 1/2" wide which I pre-washed, put in a coffee bath (or tea bath), rinsed and then tossed in the dryer to get all good and tangled. Oy but what a mess it was to un-knot but it made the cotton fray and wrinkle which is great for the antique look.
Then I rolled the foundation forward and whipped it to just to keep it stable. Frankly I prefer doing this in stages rather than all the tasks at the same time. No way my hands could handle rolling the foundation and using the cotton and still control the size of the roll. No thanks I'll just do one task at a time. What you see below is the cotton at the top and hard to see because of the flash is the rolled edge against the wooden TV tray.
Next I folded the cotton in half across the front and back of the rolled foundation and did a running stitch all the way around in and out of the ditch.
Here is another view but the flash back is making it hard to see. Amazing how the flash alters the colors.... that is the same black cotton strip as seen in the photo above. As you can tell I was taking long running stitches just to secure the cotton in place. Oops, got a photo of my TV remote in the process.
Then took some tea dye or walnut dyed cotton crochet thread and whipped around the cotton binding all the way around. You first saw the front of the rug in the first picture and here is the back. Everything is covered.
I'm so happy that Betsy taught us this in class because it looks not only old as if the rug had to be repaired, but in my case it frames the cream colored chicken. Thanks for that class Betsy and can't wait to have you again this next November.
Saundra
A little more has been hooked on it but not a whole lot as I've been doing yard work and starting to pull wool for Woolley Fox camp which happens in less than 3 weeks.
Here's the little dickens as of right now. And I'm having issues with color ~ that isn't a new thing with me as I'm color challenged I think. But since my plan was to try and replicate the vintage rug have tried getting close to the antique look. Uh, that said, you've seen how hard it is to determine some of the images not to mention the real color of the wool used.
OH, almost forgot to mention that as I was hooking the kitten decided to change the nose from the original drawing I did (like the mommy cat) to just a slit of a nose since the kitten was smaller.
I stopped working on the bottom portion of the rug since the usage of left over blue strips used in the heart don't go well the color in the section with the star. SO, in the words of Eric Sandberg, ...."hook what you know".
As I know what I want to go to the left and right of the cat (middle of the rug) figured my decision down the road will be easier if I hook those sections first. Then I can make a better choice of what to pull out and rehook....either the heart wool or the wool surrounding the star.
Actually, what caused my internalized wool uproar is not knowing what color blue to use for the flowers on the corners. They should probably be a darker blue to "anchor" the rug rather than a lighter color which would make it 'float'. Check out the antique rug in the previous post and maybe you'll see what I mean. The color of the flowers sorta looks like the color used around the star. However, it wouldn't work well with the heart colors I used that close in proximity. So something has to change. I'll let you know when I figure it out.
Before Barb's camp I wanted to bind my Chicken Challenge rug to take and show my gal pals. Plans are to use a technique Betsy Reed taught in the class last November and one I used on my pillow (in a previous post).
Thanks for hanging with me as I work thru my rugs. It really is fun to share with ya'll. Hope you have a great evening and please be kind to one another.
Saundra
Happy Easter to one and all. Thought I'd show you some theme rugs I've hooked, some mohair bears and cloth rabbits I've made and a stitchery made with the Indygo Junction monthly series.
This is a design by Claire Murray and named Strawberry Patch. It was a kit I purchased on e-bay when I thought it might be fun to hook with yarn. Cute design but have no desire to ever hook an entire rug using wool yarn or any other. Perhaps using yarn here and there in a rug as embellishment, but not a whole rug. BTW, this is way too clean and new looking for my tastes.
This pink bear has glass eyes and limbs are jointed using cotter pins.
The rug is a design by Sally Kallin of Pine Island Primitives called Harry.
A cloth painted rabbit made using a pattern by Hickety Pickety, and a hooked Easter egg.
Another mohair bear made by me.
One of the monthly series quilt blocks designed by Sarah Sporrer, then with Indygo Junction.
Another mohair bear I made when I was gung ho about working with the expensive mohair and making dolls and bears was my 'go to' craft. That is until I discovered hooking rugs.
And lest I should forget the 36" Edward Tulane rabbit pattern I designed and made several of. But, I've lost interested in making this time-consuming, but loved rabbit.
Another hooked rug with rabbits is a design by Karen Kahle called, as you can see, Stop and Smell the Roses.
A rabbit design I hooked for someone and she was to finish up the background. I think the bunny looks rather dapper.
Almost forgot about this one. It is a rabbit purse I designed and hooked but sold several years ago.
Well there you have it.....some entertainment eye candy. Hopefully you thought they were all eye candy. Have a wonderful happy Easter with family and friends.
Saundra
A little more has been accomplished on my adaptation of the vintage cat design. This is what it looks like now:
If you don't remember what the original looked like no need to scroll back thru previous posts, here is what the original looked like. I chose to do the bottom heart using dark and light wool in non-ripple effect and closer in style to the antique.
These are the wools used for the area below the section where the cat is. And the one to the far right will also be used to outline the entire rug since it is so unobtrusive and blends in with the vintage drab look.
Another thing which you need to understand is the importance of hooking INSIDE the line of the motif. If you hook on the line or outside you will be expanding the size of the motif. That would be disastrous if you were trying to hook a dainty bird. I'll discuss this more when I get ready to hook the birds and small cats in this rug. In the picture below, the circle to the left, you can see that I'm hooking just inside.
So then you need to secure the motif with a "Holding Line". Otherwise the wool will get comfy and spread out. Not only is this an important step to contain the motif but frankly I don't like leaving all the background to be the very last part of the rug to hook.
Have a great evening and HAPPY EASTER to all.
Saundra
Recently someone wrote me saying her hooked circle on a rug pattern she purchased and hooked curled and made a hump. Yup, been there done that. This is not a problem with design of the pattern but with the hooking (sorry).
I've hooked lots of circles. The rug below is a design by Fredricksburg Rugs. I loved it, still love the design and didn't have a problem with hooking the circles. The problem was using MONKS CLOTH. I hate monks cloth as it stretches too much for my liking and it is too easy to pack the wool strips because it does stretch. Now I use only linen as my backing of choice. And it is the regular, natural primitive linen and NOT the hairless stuff.
If you crochet or knit you know what happens if you don't increase stitches as you go around ~ you end up with one long tube. Same thing with hooking a circle. You must increase the outside loops so that it doesn't become a hump but a gentle flattened out circle.
Okay, in full disclosure, I am NOT an accredited teacher, NOT McGowan trained but rather self-taught and trying to help others thru their struggle like I did but without blog help. However I've attended numerous rug camps and have had some magnificent teachers in the past several years. Therefore I've learned something from them as well as the students who attend the camps.
Okay, that said...the FIRST RULE is: there are NO rules or right or wrong. Do what works for you.
Some people/teachers may say to start in the middle of a circle. But then what about the primitive style of "outline and fill"? In the picture below I did an outline of the center circle, joined the wool and snipped it off at the join. The circle on the right was started in the middle as you can see, and snipped off.
Continuing in the middle circle with the light texture I hooked all the way around but didn't cut off at the join (you'll see why in next photo). The circle to the right I hooked all around and cut off the second row at the join.
For the center circle I just continued in a spiral and ended up with one tail up in the middle. For me, this way I can control the circle better. And, if I should decide to pull out loops to change to another color... my wool strip will be longer to use again.
For the circle on the left I did the same spiral thing. This outline and fill works best for me.
In the photo below I did the continuous spiral on the circle to the left.
For me personally I like doing the outline and fill. That way I can not only control the size and shape of my circle, but have already constructed the outside circumference. Which means that there's limited space inside the remaining circle and no way I could pack my loops to make a dome.
Hope you all have a great evening. OH!!!!!! And I've lost my ability to receive comments into my personal e-mail. Does anyone know what is up with Blogger why this function would be disabled??
Saundra
First here's a glimpse of the newest rug on my frame. In a previous post I showed what I was using for the outline and the cat. The star is hooked with red wool from my worm basket as is the light area surrounding the star, I should have filled in those extra spots around the star before taking a picture since it looks like little holes.
The darker background around the cat was among the wool I dyed in anticipation of hooking this rug. It is the second from the left in this photo and it works well I think.
Just recently someone wrote me about a pattern situation and thought it was a topic worth discussing (NO, not with my pattern but one from someone else). Here is what you, as the buyer, should expect when purchasing a pattern from someone. I'm referring to those people in the business of drawing and selling patterns, me included, not someone downsizing their collection of unhooked purchased patterns.
You should expect the pattern:
- ~ drawn on straight of grain
- ~ no less than 3" margin beyond design
- ~ foundation edges secure to prevent raveling (I prefer serged edges)
Never buy a 'stamped' pattern as you can be sure it is not on the straight of grain; you want to buy a 'hand drawn' pattern. Although I draw a lot of my own patterns I also buy from other people and always take a pencil and run the pencil down the ditch at the edge to be sure it is drawn on the straight of grain before starting to hook. I know it is easy for the pen to cross lines. Of course the motifs inside may be curved, whimsical crooked houses, etc., but the outside edge should always be drawn on the straight of grain.
Must admit that accidents do happen. A bolt of linen is folded and when on a bolt there are also wrinkles. So when drawing a line down the ditch across that section is very easy to slip into the next ditch. Since I try to draw slowly, I correct myself and get back into the right ditch.
What should you do if you buy a pattern from someone and it is off one strand or two along the perimeter? If it were me and the design wasn't a game board style so the inside wasn't affected, I'd just draw the line straight and keep it. Actually, that did happen to me and I do respect that person still to this day and will buy more patterns. As I said, it is easy to be just one thread (ditch) over. But, if it was way off kilter, I'd contact the designer/drawer and request a replacement or my money back.
Anyone who has purchased a pattern from me knows that I contact them, ask if they received the pattern and if are they are pleased. And should someone buy one from me and they had an issue I would gladly give them a refund or replacement, but I'd want that pattern back they first bought. I want to keep my customers happy and would like my name thought of kindly so will try to do my best.
I'd planned to discuss hooking circles and humps they can make but think this post is long enough so will hold that for another time. It's going be chilly again tonight folks so bundle up. Was shocking to wake up to white frosty crystals of snow on my yard this morning after all the warm weather earlier in the week.
Have a great evening.
Saundra
It has been a while since you've seen my penny circle mat since my marathon hooking on the Granny Geometric ~ and oh but it does feel so good to have that geo done. For those of you who admired the rug and my progress thank you for inquiring about my drawing one out for you. One thing is for certain...I am DONE with the geometric. Even tho I drew my own I have no desire to draw the pattern for sale, sorry.
Last night I hooked a little on the penny circle mat so that there would be a little something to show and this is what it looks like right now. For those of you just visiting my blog, this was a project to 'de-worm' my wool basket and was hooking it along with the geometric since the worms were already out.
This piece measures 11 x 24; I used the lid of a vitamin bottle to draw the circles which are 2" in diameter.
And, now for the Newbie Tidbit. I drew that pattern on a leftover scrap of linen foundation and since there wasn't a sizable margin sewed a piece of cotton fabric along the sides so it would hold on my frame. You can also see that I decided to make my corners more rounded to be more eye appealing with the circle shapes.
Tomorrow I plan to write about what you, as the buyer, should expect when you purchase a pattern from someone. I'm not talking about buying a pattern on e-bay from someone who was downsizing, I'm talking about buying a pattern directly from the source... from me and other people who draw and sell patterns. I think you'll find this very enlightening and bet I have a lot of readers who aren't even newbies.... bet'cha the count of readers will be astronomical and can't wait to look at the stats after tomorrow.
Have a magnificent evening everyone, even tho the temperatures are going to drop drastically tonight.
Saundra
This was a rug on my list 'to do' but hadn't intended to start it so soon. It is a delightful rug photo found (I think) on Pinterest but it had no identifying information as to age, hooker, owner, etc.
When I posted interest on my blog there was immediate response from people wanting to buy the pattern. Normally I hook the pattern first and then post a picture on my web site so they can see it hooked by me. This time I sold two patterns before it was even hooked and posted on my blog. Well, guess it is about time I hook it.
Let me tell you it was troublesome to draw a pattern from the picture above and give credence to the original hooker since it is hard to detect images. On the right and left in red I finally decided were birds. But there are ghost images beside them and you can see red eyes ~ they are ever so faint since the picture is so distant and not very clear. At one point I thought it may have been an owl on one side. But, it was up to me to decide how to design the rug as I had two orders and hadn't even drawn for myself.
Later a comment came from Newburyarts saying he/she knew the previous owners, but I was unable to correspond as the comment was from a NO-REPLY Blogger. Therefore unable to ask for better pictures for accuracy or to obtain permission.
Thank you Lori of NotForgottenFarm for reminding me that I hadn't mentioned measurements. This pattern measures 30 x 30. BTW, Lauren will be proud of you for keeping me on my toes about dimensions since she was away at camp.
Onto the rug design.....many antique rug motifs were hooked using red. I don't know the answer as to why as I'd rather hook than research. But if you look at enough antique rugs you will also see a variety of styles as there are also lots of antique rugs which are not outlined but blend in with the background.
Here is the reveal of my start. Why oh why does the picture do this with the zebra stripes with linen photos? Anyway, as you can see I've done the Pre-Binding stitching 1" all around since it is easier now than when the rug is hooked. The outline of the cat was done with the red in #8 cut and think it was from Rebecca of The Wool Studio but not totally sure.
The cat is hooked in #8, #8.5 and #9 using the center wool which is Mashed Potato from Heavens to Betsy (below). I used different cuts because that is what I had in my worm basket. Okay, so it was the #9 I cut later when the others ran out.
Also used a few wool strips left over in near color which adds to the vintage look. The wool to the right of that is also Mashed Potato which I used in that dye recipe a post or so ago. It will also go in the rug and that was my plan.
I named the pattern "Cat, Birds and Blooms" which is a description....but sure wish I could come up with something more creative than my literal name. Any ideas out there? How's about you two gals who just purchased the pattern from me? Any suggestions? Write me personally at saundra125@comcast.net.
Hope you all have a great evening as our early summer weather is about ready to come to an end.
Saundra
Who'da thunk I really would have finished hooking this Granny Geometric? Not me; as I was sure it would go to the thrift store unfinished. All the hooking is done, the pre-binding stitching and trimming done all around and will wait its turn to be bound since the Chicken Challenge rug will be next. That is when I'm in the mood or while waiting to pick up my grandson at school it will be started.
Also finished binding the 500 Mile Betts rug I adapted from a Harriet Powers quilt block. The binding was done a few minutes at a time while waiting to get my grandson from school. But today decided to finish it.
And thanks to Lauren of Rugs and Pugs for showing me how she did her last rug label. She wrote the date, name, etc. with a silver Sharpie and wrote it on a piece of cotton binding. She then attached it to the rug. I thought that was a great idea so purchased a bronze Sharpie and put the information on my binding but hers was much neater. Sure wish I'd been more careful to have the letters all the same and spacing between words applied better. Guess it is obvious I'm not a teacher ~ I've never seen a teacher who didn't have the most perfect printing and cursive ever. Unless it was a draftsman.
Now I'm pulling a couple loops on the penny circle mat and tomorrow will start out fresh on my new project. Have a fabulous evening and hope you all have a great week.
Saundra